Monday, December 31, 2007

Oracle Apps R12 Configuration File

In this post I am going to discuss about Configuration file.

The configuration files was config.txt in R11i which plays important role in restart.In R12 it is called conf_SID.txt. It is used where database is not yet created.

Configuration file stored in three important locations:

a) $INST_TOP - Permanent
b) $ORACLE_HOME/appsutil of Database 10g R2 - Permanent
c) /tmp/ - Temporary once the installation complete, this file will be deleted from /tmp.

You can copy this config file to other machine where you want to use this config file to restart the install in which Rapid install did not get as far as creating the database.

Oracle Apps R12 Installation on Linux -VMWARE

Source: Oracle Documentation and testing enviroment created on linux on VMWARE on my laptop.

First I installed the VMWARE on XP on my laptop and then installed Oracle Enterprise Linux 4 update 5 operating system to install Oracle Applications R12.

Installation Preparation:

- Software Requirements : Which includes ar,gcc,g++,ld,ksh,make,X Display Server. JDK in part of R12. You need not install it seprately like in earlier version 11i on most of the platforms.

- X Display Server

- CPU Requirement - Depends on your enviroment demands based on number of concurrent users and their usage profiles,number of concurrent manager processes, Load etc.

- Memory Requirements: Depends on Overhead of Oracle database,SGA size,any additional software installed on box, number of Concurrent users.

- Disk Space Requirements: Depends on Stage Area for Oracle Apps R12,Language Files and Oracle Applicaitons out and log files,temp,future updates and patches and other files (e.g, o/s etc).

For Database Tier approx 45 GB for fresh install database and 133 GB for a Vision Demo database.

Applicaiton tier file systems require 28 GB.

Stage Area : If you run Rapid install from stage areas then 33 GB is required to Stage the software.

Before you start Rapid install you need to completed the following tasks:

1. Create login account depend on Single or multi user instalation

2. Create Stage Directory to stage the software of Oracle Apps R12

Stage Software contents after uncompression will be :

- Start Here
- APPL_TOP
- RDBMS
- Tools
- Databases

Also I uncompressed the Rapid Install startCD 12.0.0.23 (patch 5972626) before the installation.

There are two ways to Stage the Software:

1. Download from edelivery and uncompress

2. Insert the DVD Start here and use perl script adautostg.pl. Before running this perl script include perl 5.0053 in your path and set the DISPLAY environment variable to an active and autorized display.

Note: You can mount your DVD using root user. Perl script is located in Start Here DVD under /mnt/cdrecorder/Disk1/rapidwiz/adautostg.pl

To create Stage Directory:

1. In first method under /d01 mount point which created intially as part of o/s create StageR12 stage directory and uncompress the software from edelivery.


2. Setup the stage area directory by responding perl script options as inputIndicate the components to be staged. Insert the Rapid Install DVDs as prompted.


To Start the installation from Stage Area:

$ cd /d01/StageR12/startCD/Disk1/rapidwiz
$ ./rapidwiz

- You can start the installation using root user or oracle user. For Standard installation root user is the best option to go with. If you want to go ahead with express install then oracle user will be the best option to install Oracle Apps R12.

If you are installing first time select "create a new configuration". Restarting an installation or installing a mid tier you can use this configuration file create under base directory. In R12 file is called conf_.txt (In 11i it was config.txt).

- You can Specify DB parameters

- You can register products and country-specific functionalities

- Directory location

- Port numbers

- Database and Applicaitons Nodes Configuration Validations

Very user friendly and self explaintary screen of rapidwiz.

In any case your instalation failes you can restart the your installation using

$ ./rapidwiz -restart

I will try to post all snapshots on my blogs in future post or update the same post with snapshots including linux and vmware installation.

Location of Rapid Install logs related to installation:

Database Tier

APPS_BASE/db/tech_st/10.2.0/appsutil/log/CONTEXT_NAME/timestamp.log

Application Tier

APPS_DB/inst/apps/CONTEXT_NAME/logs/timestamp.log

CONTEXT name is SID_hostname

- Multi-Node Installation

Application Tier processing can be distributed across multiple Applications nodes. In R12 unified APPL_TOP is introduced , the same files are present on each application nodes. The difference between application nodes depends on the service groups that are enabled on each node.

In comparision to earlier release (11i) , R12 does not seperate the different APPL_TOP components (like Concurrent processing,Forms and Web)to ease the overall administration.

Step By Step Standard Installation Overview:

- execute ./rapidwiz file (rapid install wizard
- Select a Wizard Operation
- Oracle Configuration Manager
- Configuration Choice
- Global System Settings
- Database Node Configuration
- Select Licensing Type
- License Additional Products
- Licencse Products
- Select Country-Specific Functionality
- Select Internationalization Settings
- Primary Applications Node Configurations
- Primary Applicaitons Node Services
- Primary Applications Node Directories
- Review Node Information
- Additional Application Node
- Shared Application Node
- Review Additional Applications Nodes
- Review Pre-Install Tests
- Review Setup portion
- start the installation
- Monitor the status indicators and prompts
- Review Post-Installation Tests
- Review Components Installed

Collections of Metalink Notes

- Overview of Using Java with Oracle E-Business Suite Release 12 (Metalink Note 418664.1)

- Using Latest Update of Java 6.0 with Oracle E-Business Suite Release 12 (Metalink Note 455492.1)

- Upgrading Oracle 10gAS Patch Set 10.1.3.3 in Oracle E-Business Suite Release 12 (Metalink Note 454811.1)

- Integrating Oracle E-Business Suite Release 12 with Oracle Internet Directory and Oracle Single Sign-On (Metalink Note 376811.1)

- Using Discoverer 10.1.2 with Oracle E-Business Suite 11i (Metalink Note 313418.1)

- Using Discoverer 10.1.2 with Oracle E-Business Suite Release 12 (Metalink Note 373634.1)

- X Server Testing and Troubleshooting (153960.1 )

- Oracle Applications Documentation Resources for Release 12 (Metalink Note 394692.1)

- Oracle Application Framework Documentation Resources, Release 12 (Metalink Note 391554.1)

- Oracle E-Business Suite: Release 12 Release Content Documents (Metalink Note 404152.1)

- Using Transparent Data Encryption with the E-Business Suite (Metalink Note 403294.1)

- Using Transparent Data Encryption with the E-Business Suite (Metalink Note 403294.1)

- Recommended Browsers for Oracle Applications 12.0 (MetaLink Note 389422.1)

- Upgrading JRE Plugin with Oracle Applications R12 (MetaLink Note 393931.1)

- Running Oracle Database in Solaris 10 Containers - Best Practices (MetaLink Note 317257.1)

- Support Status for VMWare (MetaLink Note 249212.1)

- Best Practices for Securing Oracle E-Business Suite (Metalink Note 189367.1)

- Upgrading Sun J2SE (Native Plug-in) with Oracle Applications 12.0 for Windows Clients (Metalink Note 393931.1)

- Cloning Oracle Applications Release 12 with Rapid Clone (Metalink Note 406982.1)

- Using a Staged Applications System to Reduce Patching Downtime (Metalink Note 242480.1)

- Oracle Applications Patching FAQ (Metalink Note 174436.1)

- Recommended Performance Patches for Oracle E-Business Suite (Metalink Note 244040.1)

- Working effectively with Oracle Support (Metalink Note 166650.1)

- Project Documentation Summary for Tuning Oracle Applications (Metalink Note 165300.1)

- Interoperability Notes Oracle E-Business Suite Release 12 with Oracle Database 10g Release 2 (10.2.0) (Metalink Note 454750.1)

- Using Discoverer 10g with Oracle Applications 11i (Metalink Note 313418.1)

- Using Discoverer 10g with Oracle E-Business Suite Release 12 (Metalink Note 373634.1)

- Upgrading Forms and Reports 10g in Oracle Applications Release 12 (Metalink Note 437878.1)

- Using the OracleAS 10.1.2 Forms and Reports Builders with Oracle Applications Release 12 (Metalink Note 444248.1)


- Installing and Configuring Oracle Application Server Web Cache with Oracle E-Business Suite 11i (Metalink Note 306653.1)

- Installing and Configuring Oracle Web Cache 10g with Oracle E-Business Suite 12 (Metalink Note 380486.1)

- Using Oracle Portal 10g with Oracle E-Business Suite 11i (Metalink Note 305918.1)

- Using Oracle Portal 10g with Oracle E-Business Suite 12 (Metalink Note 380484.1)

- Getting Started with the Application Management Pack for Oracle E-Business Suite (Release 2.0) (Metalink Note 394448.1)

- eBusiness Support Diagnostics Overview (Metalink Note 342459.1)

- eBusiness Suite Support - Diagnostic Tools 11i (Metalink Note 179661.1)

- eBusiness Suite Support - Diagnostic Tools R12 (Metalink Note 421245.1)

- Cloning Oracle Applications Release 12 with Rapid Clone (Metalink Note 406982.1)

- FAQ and Troubleshooting for Oracle Configuration Manager (OCM) (Metalink Note 369619.1)

- Using Discoverer 10.1.2 with Oracle E-Business Suite R12 (Metalink Note 373634.1)

- A Holistic Approach to Performance Tuning Oracle Apps (Metalink Note 69565.1)

- Tips and Queries for Troubleshooting Advanced Topologies (Metalink Note 364439.1)

- Troubleshooting Oracle Apps Performance Issues (Metalink Note 169935.1)

- Diagnosing and Resolving Error ORA-04031 (Metalink Note 146599.1)

- Case History: Implementing a Reverse Proxy Alone in a DMZ (Metalink Note 438744.1)

- Oracle E-Business Suite 11i Configuration in a DMZ (Metalink Note 287176.1)

- Release 11i : Oracle Application Developer's Guide (Metalink Note 269138.1)

- Release 12 : Oracle Application Framework Developer's Guide (Metalink Note 394780.1)

- Diagnosing and tuning AOL/J JDBC Pool in Oracle e-Business Suite 11i (Metalink Note 278868.1)

- Overview of Using Java with Oracle E-Business Suite Release 11i (Metalink Note 300482.1)

- Upgrading Oracle JDBC Drivers with Oracle E-Business Suite 11i (Metalink Note 164317.1)

- Oracle Application Framework Profile Options Release 11i (Metalink Note 275876.1)

- Oracle Application Framework Profile Options Release 12 (Metalink Note 395445.1)

- Firewall BLACKOUT and JDBC connections with Oracle Applications 11i(Metalink Note 276557.1)

- Number of JDBC connections increase after ATG Rup 5 because jdbc parameters are lower case (Metalink Note 459072.1)

- Basic troubleshooting of JVM consuming cpu or too many JDBC connections in Apps 11i (Metalink Note 370583.1)

- Diagnosing database invalidation issues with Java Cache for eBusiness Suite (Metalink Note 455194.1)

- Existing Responsibility Does Not Appear after modifying the effective date (Metalink Note 458869.1)

- Investigating NoClassDefFoundError in eBusiness 11i when users login (Metalink Note 455366.1)

- E-Business Suite Recommended Set Up for Client/Server Products (Note 277535.1)

- Using Load-Balancers with Oracle E-Business Suite Release 12 (Metalink Note 380489.1)

- Oracle Applications Technology Software Updates, Release 12.0.2 (Metalink Note 432635.1)

- Best Practices for Securing Oracle E-Business Suite (Note 189367.1)

- Oracle E-Business Suite Release 12 Configuration in a DMZ (Metalink Note 380490.1)

- Oracle Application Server with Oracle E-Business Suite Release 11i Frequently Asked Questions (Note 186981.1)

- Oracle E-Business Suite Release 11i and Database FAQ (Note 285267.1)

- Oracle E-Business Suite Release 11i Technology Stack Documentation Roadmap (Note 207159.1)

- Cloning Oracle Applications Release 11i with Rapid Clone (Metalink Note 230672.1)

- Oracle Applications Release 11i Patching Best Practices and Reducing Downtime (Metalink Note 225165.1)

- Oracle E-Business Suite 12.0.1 Release Update Pack Readme (Note 417917.1)

- Applications DBA (AD): Note 420263.1

- Applications Technology: Note 420081.1

- Customer Relationship Management: Note 418150.1

- Financial Services: Note 418125.1

- Financials: Note 418121.1

- HRMS: Note 417916.1

- Intelligence: Note 419835.1

- Procurement: Note 418126.1

- Projects: Note 418167.1

- Supply Chain Management: Note 420030.1

- Oracle E-Business Suite Release 12 Technology Stack Documentation Roadmap (Metalink Note 380482.1)

- Best Practices for Securing Oracle E-Business Suite Release 12 (Metalink Note 403537.1)

- Oracle Application Server Diagnostic Tools and Log Files in Applications Release 12 (Metalink Note 454178.1)

- Using Forms Trace in Oracle Applications Release 12 (Metalink Note 373548.1)


- Upgrading Sun JRE (Native Plug-in) with Oracle Applications 11i for Windows Clients (Metalink Note 290807.1)

- Interoperability Notes: Oracle E-Business Suite Release 12 with Oracle 10g Release 2 (10.2.0) (Metalink Note 454750.1)

- Using Oracle E-Business Suite Release 12 with a Database Tier Only Platform on Oracle 10g Release 2 (Metalink Note 456197.1)

- Export/Import Process for Oracle E-Business Suite Release 12 Database Instances Using Oracle Database 10g Release 2 (Metalink Note 454616.1)

- Oracle Applications Installation and Upgrade Notes, Release 11i (11.5.10.2) (Metalink Note 316806.1)

- Oracle Applications Installation and Upgrade Notes, Release 12 (12.0) for HP-UX PA-RISC (Metalink Note 402308.1)

- Using Oracle VM with Oracle E-Business Suite Release 11i or Release 12 (Metalink Note 465915.1)

- Installing Oracle E-Business Suite Secure Enterprise Search, Release 12 (Metalink Note 462377.1)

- Applications 11.5.10 plus Maintenance Pack 11.5.10 CU2 or later

- Oracle Developer 6i Patchset 18 (6.0.8.27.x) or later (Metalink Note 125767.1)

- Recommended Browsers for Oracle Applications 11i (Metalink Note 285218.1)

- Removing Credentials from a Cloned EBS Production Database (Note 419475.1)

- E-Business Suite Recommended Set Up for Client/Server Products (Note 277535.1)

- Firefox2 Note 285218.1 (for Release 11i)

- Firefox2 Note 389422.1 (for Release 12)

- About Oracle Fusion Intelligence for E-Business Suite, Release 12.0 (Metalink Note 427835.1)

- About Oracle Fusion Intelligence For E-Business Suite, Release 11i, Family Pack H (Metalink Note 406004.1)

- Working effectively with Oracle Support (Metalink Note 166650.1)

- Sharing the Application Tier File System in Oracle E-Business Suite 11i (Metalink Note 233428.1)

- Sharing the Application Tier File System in Oracle E-Business Suite Release 12 (Metalink Note 384248.1)

- Advanced Configurations and Topologies for Enterprise Deployments of E-Business Suite 11i (Note 217368.1)

- Database Initialization Parameters and Configuration for Oracle Applications 11i (Metalink Note 216205.1)

- Metalink Note 287176.1 for Release 11i

- Metalink Note 380490.1 for Release 12

- OracleAS Integration with Oracle E-Business Suite: Statement of Direction (Metalink Note 223927.1)

- Oracle Applications Release 12 Upgrade Sizing and Best Practices (Metalink Note 399362.1)

- Virtual IP Metalink Note 287176.1 (for Release 11i) or Note 380489.1 (for Release 12)

- Integrating Oracle E-Business Suite Release 11i with Oracle Internet Directory and Oracle Single Sign-On (Metalink Note 261914.1)

- Database Intialization parameters for Oracle Applications Release 12 (Metalink 396009.1)

- Best practice for Securing Oracle E-Business Suite Release 12 (Metalink 403537.1)

- Sharing The Application Tier File System in Oracle E-Business Suite Release 12 (Metalink # 384248.1)

- Using Load-Balancers with Oracle E-Business Suite Release 12 (Metalink # 380489.1)

Oracle E-Business Suites R12 supported platforms

In this post you will come to know about supported platforms with R12:

IBM AIX 5L - Follow metalink note # 402306.1

HP-UX (Itanium) - Follow metalink note # 402307.1

HP-UX(PA-RISC) - Follow metalink note # 402308.1

Sun Solaris (SPARC) - Follow metalink note # 402312.1

Linux (32-bit) - Follow metalink note # 402310.1

Linux (64-bit) - Follow metalink note # 416305.1

Microsoft Windows - Follow metalink note # 402311.1

Application Technology Stack R12 - Important Changes


Source:Oracle Documetations and research:


Application Directory Structure - Oracle Application R12

In this post I am going discuss about important changes in R12 Oracle Technology Stack .

Oracle DB Tier technolgoy :Oracle Database 10g introduces in place old Oracle Database 9i version.

Application Technology Stack:

1. Application Server version 10.1 introduce in place of old version 1.0 in 11i.

2. Oracle Application Server 10.1.3 ORACLE_HOME (New Version 10.1.3) introudce in place of old version Oracle HTTP Server/Apache 1.3.19 in 11i.

3. Oracle Application Server 10.1.2 ORACLE_HOME(10g )introduce in place of old version Oracle Developer 6i in 11i.

4. Oracle JDeveloper 10g introduce in place of old version 9i with 11i.

5. OC4J is introduce for Application tier in place of Jserv in 11i.

Overview of Oracle Apps R12 Rapid Install

Source : Oracle Documentations

Overview of Rapid Install in R12 environment:

Rapid install utility install a new database node or Applications node technology stack. It placed the file system and configure server processes for an upgraded system also install a new , fully configured Oracle Apps system,which includes tech stack,patches and other latest update available at the time of product release.

Rapid Install

- Database : Includes data files

- Application Tech Stack :Two different ORACLE_HOME
- 10.1.2 ORACLE_HOME
- 10.1.3 ORACLE_HOME
- File System :New Instance top $INST_TOP

Oracle E-Business Suite R12

Source :Oracle Documentation and based on Experience on testing environment created on my Laptop.

In this post I am going to cover the Overview of R12 Oracle E-Business Suites Applications.

An integrated suites of Applications for e-business solutions. It is stored in an Oracle Database and a File system (which includes business and product data). The file system part consists of Forms,Reports,Concurrent Programs,Programs and scripts, HTML and Java. Also Oracle database contains data and code objects.

Oracle E-Business Home page provides a consistent look and feel across all Oracle Applcations Products. Home page is starting point for HTML interface and the Forms interface.


Oracle Applications R12 Application Technology Stack

Oracle Applications

Oracle Applications Products

Applications Technology Stack

Oracle Developer 10g Oracle Application server 10g
(10.1.2 ORACLE_HOME) (10.1.3 ORACLE_HOME)
(Provides Forms Services) (Provides Web Services)

Database Server
Oracle 10g Release 2
(10.2.0.2)


- In multi-node installation in R12, Rapid install will by default create a system that shares the application tier file systems as well as the $APPL_TOP and $COMMON_TOP file systems. The application tier file system can therefore be shared across multiple application tier nodes and should be same o/s.

R11i required each application tier to maintain its own file system, consistiing of APPL_TOP file system and the application tier tech stack file system. But with 11.5.10CU2 rapid install support for a shared file system.


Technology Stack Components

Oracle Developer which includes Oracle Forms and Oracle Reports. Installed in OracleAS 10.1.2 Developer Tools ORACLE_HOME also known as C ORACLE_HOME.

Oracle HTTP Server based on Apache and installed in the OracleAS 10.1.3 Web Oracle Home also known as Java ORACLE_HOME.

Definations:

Tier
A tier is a logical grouping of services, potentially spread across more than one physical machine.

Client Tier
The client interface is provided through HTML for the HTML-based applications, and via a Java applet in a Web browser for the traditional Forms-based interface. In Oracle Applications Release 12, each user logs in to Oracle Applications through the E-Business Suite Home Page on a desktop client web browser. The E-Business Suite Home Page provides a single point of access to HTML-based applications, Forms-based applications, and Business Intelligence applications.

Application Tier
The application tier hosts the various services that process the business logic and manage communication between the desktop tier and the database tier. This tier runs the web server and the associated processes, concurrent processing server, Interaction and Oracle fulfillment server.

Database Tier
The database tier contains the Oracle database server which stores all the data maintained by Oracle Applications. This tier has the Oracle data server files and Oracle Applications database executables that physically store the tables, indexes, and other database objects in the system.

OPMN
Oracle Process Manager and Notification Server (OPMN) is installed and configured on every tier designated to run the web application. OPMN provides an integrated way to manage all Oracle Application Server components. OPMN consists of two main pieces: the Process Manager and the Notification Server. The Process manager (PM) is the centralized process management mechanism in Oracle Application Server and is used to manage all Oracle Application Server processes. The PM starts, restarts, stops, and monitors every process it manages. It also performs death-detection and automatic restart of the processes. Oracle Notification Server (ONS) is the transport mechanism for failure, recovery, startup, and other related notifications between components in Oracle Application Server.

OHS
Oracle HTTP Server (OHS) is installed and configured on every tier that is designated to run the web application . It provides the key infrastructure required for serving the static and dynamic content generated by Oracle E Business Suite products.

OC4J
Oracle Containers for J2EE (OC4J) is the core Java 2 Platform Enterprise Edition (J2EE) runtime component of Oracle Application Server. It is installed and configured on every tier that is designated to run the web application. It is a fully J2EE 1.5 compliant container that runs on a standard file based JDK 1.5 Java Virtual Machine and provides complete support for Java Server Pages (JSP) , Servlets, Enterprise Java Beans (EJB), Web Services and all J2EE services.

Web Entry Point
Web Entry Point refers to the host name which is designated to be used by all users to access the Oracle E-Business Suite Release 12 system. By default, the web entry point is set to the hostname of the application server where Oracle E-Business Suite is installed. In the case where a load-balancer is used, the Web Entry Point becomes the load-balancer's host name.

Sunday, December 9, 2007

Do You know High Availability Options Does Oracle Application Server Support

Source: Oracle Documentations


Yes It provides High Availability foundation and architecture, which is suited to different customer requirements.

Oracle Application Server includes security and identity management features to provide a combination of flexibility and security across enterprise applications and infrastructures.

Oracle AS Identity Management 10g (10.1.4.0.1) is an integrated, standard-based identity management solution. Oracle AS Identity management consists of different components that are deployed on multiple tiers. The availability of each component has a direct impact on the availability of the system.

A highly available OracleAS Identity Management Solutin deployment requires a highly available database, Identity Management services,and Middle tier Applications.Oracle Identity Management 10g Release (10.1.4.0.1) consists of the following Identity Management components in various HA Topologies:

- Oracle Internet Directory
- Oracle Directory Integration and Provisioning (DIP)
- Oracle Single Sign On (SSO)
- Oracle Delegated Administrative Service (DSA)
- Oracle Identity Server
- Oracle Access Server
- Oracle Access Manager
- WebGate
- WebPass
- Oracle Identity Federation Server


The Primary OracleAS Identity Management High Availability architecture solutions are:

1. OracleAS Cluster (Identity Management) Topology

2. Distributed OracleAS Cluster (Identity Management) Topology

3. OracleAS Cold Failover Cluster (Infrastructure) Topology

4. Distributed Cold Failover Cluster (Infrastructure) Topology

5. OracleAS Cold Failover Cluster (Identity Management) Topology

6. Distributed OracleAS Cold Failover Cluster (Identity Management) Topology

7. Oracle Access Manager Active-Active Topology

8. Oracle Access Manager Active-Active Topology with Active-Passive OID

9. OracleAS Cold Failover Cluster Topology for Oracle Identity Federation

I will discuss the High Availability Architecture Solutions in my future posts.

Is it Possible to use Multiple Metadata Repositories


Source : Oracle Documentations

Answer is Yes, You can opt to install multiple metadata repositories to increase performance. This way you can configure your components to use different metadata repositories.

Guidelines to use Metadata Repositories:

1. To enable a Portal and Wireless or a Business Intelligence and Forms middle tier to use a second metadata repository for product metadata.

a. Install the second metadata repository and register it with the Oracle Internet Directory.

You can do this using the installer or the OracleAS RepCA. Use the installer to create a new database containing the OracleAS Metadata Repository, or use the OracleAS RepCA to install the OracleAS Metadata Repository in an existing database.

b. When you install the Portal and Wireless or the Business Intelligence and Forms middle tier, select the second metadata repository from the list of registered repositories. This is the metadata repository that the middle tier will use for its product metadata.


2. To use a second metadata repository for a J2EE and Web Cache middle tier, you have different options, depending on which J2EE and Web Cache features you need:

a. If you need both the Oracle Identity Management Access feature and the Database-Based Farm feature, you need to register the second metadata repository with the Oracle Internet Directory.

b. If you need only the Database-Based Farm feature, you do not need to register the second metadata repository. The reason for this is that you might not have an Oracle Internet Directory.


Scenario where two metadata repositories are involved and using 4 HOSTS.

HOSTA runs a metadata repository and Oracle Identity Management components. The Oracle Identity Management components use this metadata repository.

HOSTB has a metadata repository that is registered with the Oracle Internet Directory running on HOSTA.

HOSTC has a Portal and Wireless middle tier. This middle tier knows to use the metadata repository on HOSTA for its product metadata because it was registered with that metadata repository during installation.

HOSTD also has a Portal and Wireless middle tier. This middle tier knows to use the metadata repository on HOSTB for its product metadata because it was registered with that metadata repository during installation.


Notes:

If you are installing multiple metadata repositories on the same computer, each metadata repository must have a unique global database name and system identifier (SID).

If you are registering multiple metadata repositories with the same Oracle Internet Directory, each metadata repository must have a unique global database name and SID. If not, the Oracle Internet Directory Configuration Assistant will fail when you install the second metadata repository with the same name.


How to Specify Namespace in Internet Directory

The distinguished name (DN) that you specify on this screen will be designated as the namespace in Oracle Internet Directory where users and groups are administered.

Select the suggested namespace if it meets your deployment requirements. If not, enter a DN that you want in the custom namespace field. The installer determines the suggested namespace from the /etc/hosts file. If you plan to integrate your Oracle Identity Management components with a third-party directory, you should specify the DN of a namespace that matches the DN of the default namespace in the third-party directory


How to Determine Port Numbers Used by Components

During installation, you might need to know port numbers used by certain Oracle Application Server components. For example, if you install OracleAS Infrastructure against an existing Oracle Internet Directory, the installer prompts for the Oracle Internet Directory hostname and port number.

You can get a list of port numbers in the following ways:

Use Oracle Enterprise Manager 10g Application Server Control.

Click the Ports link on the Enterprise Manager home page. This takes you to a page that lists all ports in use and the suggested port ranges for different components.

Look in the ORACLE_HOME/install/portlist.ini file. ORACLE_HOME refers to the directory containing the Oracle Application Server installation.

Note that if you change a component's port number after installation, the portlist.ini file is not updated. The portlist.ini file is not updated after installation.

Special Tips for Installiation of Oracle Identity Management Components Separately

Source: Oracle Documentations

Guidelines for Installation of Oracle Identity Management Components Separately

1. For the same OracleAS Metadata Repository not allowed to install and configure more then one OCA against.

2. For same Oracle AS Metadata Repository allowed to install and configure more than one OracleAS Single Sign-On, Oracle Delegated Administration Services, or Oracle Directory Integration Platform.Can configure more than one Oracle Internet Directory against the same OracleAS Metadata Repository.

3. If you configure OracleAS Single Sign-On and Oracle Delegated Administration Services in separate installations against the same Oracle Internet Directory, make sure you configure OracleAS Single Sign-On before Oracle Delegated Administration Services. This is because Oracle Delegated Administration Services depends on mod_osso, which will not be set up during installation unless the Oracle Internet Directory it points to already has OracleAS Single Sign-On configured.

4. If you have an Oracle Identity Management installation that includes Oracle Directory Integration Platform but does not include Oracle Internet Directory, you will still see an Oracle Internet Directory process in the opmnctl status output. This is because oidmon must be installed and started in order to start the Oracle Directory Integration Platform process.

Special Note:1. You cannot configure Oracle Internet Directory after installation. You need to install and configure Oracle Internet Directory through the installer.

2. You can install the OracleAS Metadata Repository in a new database, or in an existing database.

3. You can use an existing Oracle Internet Directory instead of having the installer create a new one. You might want to do this if your applications need to authenticate users that are already stored in your Oracle Internet Directory. During the infrastructure installation, do not select "Oracle Internet Directory" in the Select Configuration Options screen.

You need to provide the connect information (hostname, port, username, password) for the existing Oracle Internet Directory.

The Oracle Internet Directory must be version 9.0.4 or later. Note that Oracle Internet Directory version 9.2.x is not supported.

To determine the Oracle Internet Directory version, make sure that Oracle Internet Directory is up and running. Then run the following command:

$ oidldapd -version

The oidldapd command can be found in the ORACLE_HOME/bin directory, where ORACLE_HOME is the root directory where you installed Oracle Internet Directory.

4. The OracleAS Metadata Repository and the Oracle Internet Directory work closely together. Before you can use an OracleAS Metadata Repository (in most cases), ensure that it is registered with an Oracle Internet Directory.

An exception to this rule is when you want to use a J2EE and Web Cache middle tier with the Database-Based Farm feature but without the Oracle Identity Management Access feature. In this case, you need an OracleAS Metadata Repository, but it need not be registered with an Oracle Internet Directory.

Step by Step Guide of Installing OracleAS Metadata Repository in a New Database

Source:Oracle Documentation

Step by Step Guide of Installing OracleAS Metadata Repository in a New Database


Note:This Installation option does not install any Oracle Identity Management components.

1. Start up the installer and complete the first few screens. Follow instruction of "Install Fragment: The First Few Screens of the Installation" discussed in earlier post.


In the Select Installation Type screen, select Metadata Repository.

2. Select Configuration Options

Do not select High Availability and Replication.

Click Next.

3. Register OracleAS Metadata Repository

If you already have an Oracle Internet Directory and know its connect information, select Yes and enter the name of the computer where Oracle Internet Directory is running and the port number. See Section 4.17, "How to Determine Port Numbers Used by Components" if you do not know the port number.

Use Only SSL Connections with this Oracle Internet Directory: Select this option if you want Oracle Application Server components to use only SSL to connect to Oracle Internet Directory.

If you do not have an Oracle Internet Directory, or do not know its connect information, select No.

Click Next.

4. Specify Oracle Internet Directory Login

This screen appears only if you selected Yes in the previous screen.

Username: Enter the username for logging into Oracle Internet Directory. The user must belong to the iAS Admins group in Oracle Internet Directory.

Password: Enter the password.

Realm: This field appears only if your Oracle Internet Directory contains multiple realms. Enter the name of the realm against which to authenticate the user.

Click Next.

5. Oracle Database screens

Enter information for the OracleAS Metadata Repository database. Follow instructions of "Install Fragment: Database Screens".

6. Finish the installation.

7. Unlock the dcm schema, and set its password. This step is required only if you want to use the metadata repository for database clustering of middle-tier instances.

Set the ORACLE_HOME environment variable to point to the full path of the directory where you installed the OracleAS Metadata Repository.

Set the ORACLE_SID environment variable to the SID of the OracleAS Metadata Repository.

Unlock the dcm schema and set its password using SQL*Plus.

The following alter user command sets the password to "hello1234", but you can set it to any value.

$ $ORACLE_HOME/bin/sqlplus "sys/password as sysdba"

SQL> alter user dcm identified by hello1234 account unlock;

Special Note:

Installation of OracleAS Metadata Repository when installing the infrastructure, the installer creates a new database and populates it with the OracleAS Metadata Repository schemas. The instance is different from other Oracle Application Server instances. During the installation of OracleAS Metadata Repository Installer does not ask for AS instance name and once the installations is finished, OEM 10gAS Server control is not started up, because it is not configured for this instance. As this instalaltion steps only install the metadata which is not required to manage.

Saturday, December 8, 2007

Step by Step Guide of Installing a Distributed Oracle Identity Management with a Standalone Oracle HTTP Server


A topology where Oracle Home 1 contains Oracle HTTP Server, Oracle Home 2 contains Oracle Application Server Single Sign-On, and Oracle Delegated Administration Services, and Oracle Home 3 contains Oracle Internet Directory and Oracle Directory Integration Platform. Both Oracle Homes 2 and 3 are associated with an OracleAS Metadata Repository.

The first Oracle Home contains Oracle HTTP Server. The second Oracle Home contains OracleAS Single Sign-On and Oracle Delegated Administration Services. The second Oracle Home contains Oracle Internet Directory and Oracle Directory Integration Platform. This topology can be associated with a 10g Release 2 (10.1.2) or 10g Release 3 (10.1.3) middle tier.

For Requirements:

http://download.oracle.com/docs/cd/B28196_01/install.1014/b28194/reqs.htm#CHDCBEJG

Install OracleAS Metadata Repository on a shared disk. It is recommended that you install OracleAS Metadata Repository in an existing database. See Oracle Application Server Metadata Repository Creation Assistant User's Guide for details.

Install Oracle HTTP Server with Apache 2.0 from Oracle Application Server Companion CD, included in the 10g Release 2 (10.1.2) or 10g Release 3 (10.1.3) CD Pack.

1) For Oracle Home 3, follow the installation instructions of, "Installing Oracle Identity Management Components Only (Including Oracle Internet Directory)".

On the Select Configuration Options screen, perform the following steps:

Select Oracle Internet Directory.

Do not select Oracle Application Server Single Sign-On.

Do not select Oracle Application Server Delegated Administration Services.

Select Oracle Directory Integration Platform.

Do not select Oracle Application Server Certificate Authority (OCA).

Select High Availability and Replication.

2) For Oracle Home 2, follow the installation instructions of, "Installing Oracle Identity Management Components Only (Excluding Oracle Internet Directory)".

On the Select Configuration Options screen, perform the following steps:

Do not select Oracle Internet Directory.

Select Oracle Application Server Single Sign-On.

Select Oracle Application Server Delegated Administration Services.

Do not select Oracle Directory Integration Platform.

Do not select Oracle Application Server Certificate Authority (OCA).

Select High Availability and Replication.

3) On Oracle Home 2 and 3, perform the following commands to disable Oracle HTTP Server:

Edit the ORACLE_HOME/opmn/bin/opmn.xml file to change the Oracle HTTP Server status to disabled, as shown in below:

Note: this is in one line. < > are removed due to some issue on this web page.

ias-component id="HTTP_Server" status="disabled"
process-type id="HTTP_Server" module-id="OHS"
module-data.../ias-component

Perform the following command to stop OPMN:

$ ORACLE_HOME/opmn/bin/opmnctl stopall

Perform the following command to start OPMN:

$ ORACLE_HOME/opmn/bin/opmnctl startall

Configure the standalone Oracle HTTP Server in Oracle Home 1. See "Configuring Standalone Oracle HTTP Server with Oracle Application Server" in oracle Documentation.

Step by Step Guide of Installing a Distributed Oracle Identity Management with an Integrated Oracle HTTP Server


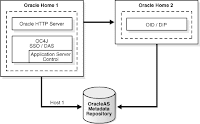
A topology where Oracle Home 1 contains Oracle HTTP Server, Oracle Application Server Single Sign-On, and Oracle Delegated Administration Services. Oracle Home 2 contains Oracle Internet Directory and Oracle Directory Integration Platform. Both Oracle Homes are associated with an OracleAS Metadata Repository


The first Oracle Home contains Oracle HTTP Server, OracleAS Single Sign-On, and Oracle Delegated Administration Services. The second Oracle Home contains Oracle Internet Directory and Oracle Directory Integration Platform. This topology can be associated with a 10g Release 2 (10.1.2) or 10g Release 3 (10.1.3) middle tier.

Installing Oracle Identity Management Components Only (Excluding Oracle Internet Directory)
Perform this procedure to install Oracle Identity Management components without installing an OracleAS Metadata Repository or Oracle Internet Directory.

Use this procedure to install additional OracleAS Single Sign-On, Oracle Delegated Administration Services, or Oracle Directory Integration Platform components against an existing Oracle Internet Directory.

For Requirements :http://download.oracle.com/docs/cd/B28196_01/install.1014/b28194/reqs.htm#CHDCBEJG

Prerequisites: OracleAS Metadata Repository, Oracle Internet Directory version 9.0.4 or later.


1. Start up the installer and complete the first few screens. Follow Instruction of "Install Fragment: The First Few Screens of the Installation".


In the Select Installation Type screen, select Oracle Identity Management.

2. Select Configuration Options

Do not select Oracle Internet Directory.

Select Oracle Application Server Single Sign-On.

Select Oracle Application Server Delegated Administration Services and/or Oracle Directory Integration Platform if you need the services provided by these components.

Select Oracle Application Server Certificate Authority (OCA) if you want to configure your own certificate authority which can issue certificates for users and servers.

Do not select High Availability and Replication.

Click Next.

3. Specify Port Configuration Options

select Automatic for default ports

Created a staticports.ini file, select Manual and enter the fullpath to your staticports.ini file for non-default ports.

Click Next.

4. Register with Oracle Internet Directory

Hostname: Enter the name of the computer where Oracle Internet Directory is running.

SSL Port: Enter the SSL port at which Oracle Internet Directory is listening.

Click Next.

5. Specify Oracle Internet Directory Login

Username: Enter the username to log in to Oracle Internet Directory. You must log in as a user who belongs to the necessary groups in Oracle Internet Directory. Which groups are necessary depends on which components you are installing. Look for Groups Required to Configure or Deinstall Components.

Password: Enter the password for the username.

Realm: Enter the realm against which to validate the username. This field appears only if your Oracle Internet Directory has multiple realms.

Click Next.

6 . Specify ODS Password

Enter the password for the ODS schema in the OracleAS Metadata Repository. The ODS schema is the main schema used by Oracle Internet Directory.

By default, the ODS password is the same as the ias_admin password (the password that you entered in the Specify Instance Name and ias_admin Password screen).

Click Next.

7. Enter information to configure OCA

Provide the information as prompted by the OCA screens. See Section 4.30, "Install Fragment: OCA Screens" for details.

8. Specify Instance Name and ias_admin Password

Instance Name: Enter a name for this infrastructure instance.

Example: id_prod

ias_admin Password and Confirm Password: Set the password for the ias_admin user. This is the administrative user for the instance.

Passwd Example: hello1234

Click Next.

9. Finish the installation.


Installing Oracle Internet Directory Only

Perform this procedure to install an Oracle Internet Directory.

Prerequisite: OracleAS Metadata Repository


Screen Action

1. Start up the installer and complete the first few screens. See Section 4.27, "Install Fragment: The First Few Screens of the Installation" for details.

In the Select Installation Type screen, select Identity Management.

2. Select Configuration Options
Select Oracle Internet Directory.

Do not select Oracle Application Server Single Sign-On.

Do not select Oracle Application Server Delegated Administration Services.

Do not select Oracle Directory Integration Platform.

Do not select Oracle Application Server Certificate Authority (OCA).

Do not select High Availability and Replication.

Click Next.

3. Specify Port Configuration Options

select Automatic for default ports.

Ceated a staticports.ini file, select Manual and enter the fullpath to your staticports.ini file for non-default ports.

Click Next.

4. Specify Repository

Username: Enter the username to use to log in to the OracleAS Metadata Repository database. The user must have DBA privileges.

Password: Enter the user's password.

Hostname and Port: Enter the name of the computer where the database is running, and the port number at which it is listening. Use the format: host:port.

Service Name: Enter the service name of the database. Note that the service name must include the database domain name.

Example: prod.quickoracle.com

Click Next.

5. Specify Namespace in Internet Directory

Select the suggested namespace, or enter a custom namespace for the location of the default Oracle Identity Management realm.

Ensure the value shown in Suggested Namespace meets your deployment needs. If not, enter the desired value in Custom Namespace.

Click Next.

6. Specify Instance Name and ias_admin Password

Instance Name: Enter a name for this infrastructure instance.

Example: infraProd

ias_admin Password and Confirm Password: Set the password for the ias_admin user.

Example: hello1234

Click Next.

7. Finish the installation.


Installing OCA and OracleAS Metadata Repository Only

Perform this procedure to install the OCA and the OracleAS Metadata Repository components only.

Prerequisites: Oracle Internet Directory version 9.0.4 or later


Screen Action
1. Start up the installer and complete the first few screens.


In the Select Installation Type screen, select Identity Management and OracleAS Metadata Repository.

2. Select Configuration Options
Do not select Oracle Internet Directory because you want to use an existing one.

Do not select Oracle Application Server Single Sign-On.

Do not select Oracle Application Server Delegated Administration Services.

Do not select Oracle Directory Integration Platform.

Select Oracle Application Server Certificate Authority (OCA).

Do not select High Availability and Replication.

Click Next.

3. Specify Port Configuration Options

Select Automatic for Default ports.

Created a staticports.ini file, select Manual and enter the fullpath to your staticports.ini file for non-default ports.

Click Next.

4. Register with Oracle Internet Directory

Hostname: Enter the name of the computer where Oracle Internet Directory is running.

SSL Port: Enter the SSL port at which Oracle Internet Directory is listening.

Click Next.

5. Specify Oracle Internet Directory Login

Username: Enter the username to log in to Oracle Internet Directory. You must log in as a user who belongs to the Trusted Application Admins group and to the iAS Admins group in Oracle Internet Directory.

Password: Enter the password for the username.

Realm: Enter the realm against which to validate the username. This field appears only if your Oracle Internet Directory has multiple realms.

Click Next.

6. OCA screens

Enter information to configure OCA. Follow Instructions of "Install Oracle Application Certificate Authority Screens".

7. Oracle Database screens

Enter information for the OracleAS Metadata Repository database. Follow instructions of "Install Fragment: Database Screens".

8. Specify Instance Name and ias_admin Password

Instance Name: Enter a name for this infrastructure instance.

Example: infroca_prod

ias_admin Password and Confirm Password: Set the password for the ias_admin user.

Example: hell1234

Click Next.

9. Finish the installation.


Install Fragment: The First Few Screens of the Installation

1. Start the installer.

2. Welcome

Click Next.

3. Specify Inventory Directory and Credentials

This screen appears only if this is the first installation of any Oracle product on this computer.

Enter the full path of the inventory directory: Enter a full path to the inventory directory. Enter a directory that is different from the Oracle home directory for the product files.

Example: /d01/app/oracle/oraInventory

Specify Operating System group name: Select the operating system group that will have write permission for the inventory directory.

Example: oinstall

Click Next.

4. Run orainstRoot.sh


This screen appears only if this is the first installation of any Oracle product on this computer.

Run the orainstRoot.sh script in a different shell as the root user. The script is located in the oraInventory directory.

After running the script, click Continue.

5. Specify File Locations

Name: Enter a name to identify this Oracle home.

Example: INFRA_HOME

Path: Enter the full path to the destination directory. This is the Oracle home. If the directory does not exist, the installer creates it. If you want to create the directory beforehand, create it as the oracle user; do not create it as the root user.

Example: /d01/app/oracle/infra

Click Next.

6. Specify Hardware Cluster Installation Mode

This screen appears only if the computer is part of a hardware cluster.

If you are installing an infrastructure, select the computers in the hardware cluster where you want to install the infrastructure. You can select multiple computers, or you can just select the current computer.

Click Next.

7. Select a Product to Install

Select Oracle Application Server Infrastructure 10g.

If you need to install additional languages, click Product Languages.

Click Next.

8. Select Installation Type

The options displayed on this screen depend on what you selected in the Select a Product to Install screen.

The installation types for OracleAS Infrastructure are:

Identity Management and Metadata Repository

Identity Management

Metadata Repository

Click Next.

If you get an error message saying that the TMP environment variable is not set, it means that the default temp directory does not have enough space. You can either set the TMP environment variable to point to a different directory or free up enough space in the default temp directory.


9. Upgrade Existing Oracle9iAS Infrastructure

This screen appears if the installer detects an Infrastructure Release 2 (9.0.2) instance on the computer and you selected to install OracleAS Infrastructure.

This screen presents you with the option to upgrade the existing Release 2 (9.0.2) Infrastructure, or install the current version of the OracleAS Infrastructure. If you want to upgrade, see the Oracle Application Server Upgrade and Compatibility Guide.

10. Confirm Pre-Installation Requirements

Verify that your computer meets all the requirements. Click Next.


Install Fragment: Database Screens

If you are installing a new database for the OracleAS Metadata Repository

1. Specify Database Configuration Options

Global Database Name: Enter a name for the OracleAS Metadata Repository database. Append a domain name to the database name. This domain name for the global database name can be different from your network domain name.

Example: prod.quickoracle.com


SID: Enter the system identifier for the OracleAS Metadata Repository database. Typically this is the same as the global database name, but without the domain name. The SID must be unique across all databases on this system.


Example: prod

Database Character Set: Select the character set to use.

Database File Location: Enter the full path to the parent directory for the data files directory. This parent directory must already exist, and you must have write permissions in this directory.

The installer will create a subdirectory in this parent directory, and the subdirectory will have the same name as the SID. The data files will be placed in this subdirectory.

Example: If you enter /d02/oradata, and the SID is prod, then the data files will be located in /d02/oradata/orcl.

Click Next.

2. Specify Database Schema Passwords

Set the passwords for these privileged database schemas: SYS, SYSTEM, SYSMAN, and DBSNMP. You can set different passwords for each schema, or you can set the same password for all the schemas.

Click Next.

Step by Step Installation Guide of Oracle Identity Management in a Single Oracle Home


Source: Oracle Documentation - For Education,Testing and Evaluation Purpose.

A topology where Oracle HTTP Server, Oracle Application Server Single Sign-On, Oracle Delegated Administration Services, Oracle Internet Directory, and Oracle Directory Integration Platform are located in the same Oracle Home. This Oracle Home is associated with an OracleAS Metadata Repository.

For Requirements :

http://download.oracle.com/docs/cd/B28196_01/install.1014/b28194/reqs.htm#CHDCBEJG

The below Oracle Software can be used for this installation:

10g Release 2 (10.1.2)
or
10g Release 3 (10.1.3) middle tier

Software and Hardware Requirements:

- Download the Software

http://www.oracle.com/technology/software/products/ias/htdocs/101401.html

- System Requirements:

http://download.oracle.com/docs/cd/B28196_01/install.1014/b28194/reqs.htm#BABICBJA


Installing Oracle Identity Management Components Only (Including Oracle Internet Directory)


Note: Installation of Oracle Identity Management Components without OracleAS Metadata Repository

Prerequisite:

OracleAS Metadata Repository that is not already registered with any Oracle Internet Directory


1. ./runInstaller


In the Select Installation Type screen, select Oracle Identity Management

2.Select Configuration Options

- Select Oracle Internet Directory
- Select Oracle Application Server Single Sign-On
- Select Oracle Application Server Delegated Administration Services and/or Oracle Directory Integration Platform if you need the services provided by these components.

- Select Oracle Application Server Certificate Authority (OCA) if you want to configure your own certificate authority which can issue certificates for users and servers.

Do not select High Availability and Replication.

Click Next.

Note:1)These components are optional, but you might want to install them because they provide the following services:

Oracle Delegated Administration Services provide a browser-based interface to Oracle Internet Directory. Users can use the interface to perform tasks such as changing their passwords, searching for other users in the directory, and creating groups. Users can even create additional users (if they have the proper privilege).

Oracle Directory Integration Platform enables you to integrate applications and third-party LDAP directories with Oracle Internet Directory. You can use Oracle Directory Integration Platform to synchronize data in all directories, and to send notifications to applications when data in Oracle Internet Directory changes (for example, when you add users or groups to Oracle Internet Directory).

2) OCA:If you select Oracle Application Server Certificate Authority (OCA) in the Select Configuration Options screen when you are installing an OracleAS Infrastructure, the installer displays the screens. Follow OCA Installation steps at the end of Oracle Identity Management steps


3. Specify Port Configuration Options

-select Automatic for default ports.

- Created a staticports.ini file, select Manual and enter the fullpath to your staticports.ini file.

Click Next.

4. Specify Repository

- Username: Enter the username to use to log in to the OracleAS Metadata Repository database. The user must have DBA privileges.

- Password: Enter the user's password.

- Hostname and Port: Enter the name of the computer where the database is running, and the port number at which it is listening. Use the format: host:port.

- Service Name: Enter the service name of the database. Note that the service name must include the database domain name.

Example: prod.quickoracle.com

Click Next.

5.Specify Namespace in Internet Directory

- Select the suggested namespace, or enter a custom namespace for the location of the default Oracle Identity Management realm.

- Ensure the value shown in Suggested Namespace meets your deployment needs. If not, enter the desired value in Custom Namespace

6. Enter information to configure OCA

Provide the information as prompted by the OCA screens.

7. Specify Instance Name and ias_admin Password

Instance Name: Enter a name for this infrastructure instance.

exmaple: id_prod

ias_admin Password and Confirm Password: Set the password for the ias_admin user. This is the administrative user for the instance.

example : hello1234

8. Finish the installation


Oracle Application Server Certificate Authority (OCA) Install:


Note 1: You cannot install more than one OCA against the same OracleAS Metadata Repository. When you are installing Oracle Identity Management components only against an existing OracleAS Metadata Repository, be sure that the metadata repository does not already have an instance of OCA configured against it.

Note 2:You install OracleAS Metadata Repository and Oracle Identity Management components including OCA on a computer. Then if you try to install additional Oracle Identity Management components (including OCA) on the same or different computer against the same OracleAS Metadata Repository, this installation would fail.


1. Select OracleAS Metadata Repository

Note: This screen appears only if you are configuring OCA and you are using an existing Oracle Internet Directory and you are using an existing OracleAS Metadata Repository. The Oracle Internet Directory must contain the registration for the OracleAS Metadata Repository that you want to use.

Select the OracleAS Metadata Repository that you want OCA to use.

Click Next.

2. Specify OCA Distinguished Name

OCA uses the DN specified on this screen to populate the Issuer field of certificates that it issues.

Typical DN: Use this section if your DN uses only the attributes listed in this section. You do not have to fill in all the attributes specified in this section. Only the o (organization) attribute is required. Note that the ' (single quote) character is not a valid character in any of the attributes.

Common Name (CN): Enter the name that you want on the certificate. This name must be different from your hostname. Example:

Ramnik Gupta.

Organizational Unit (OU): Enter the name of your division or department. Example: Operations.

Organization (O)*: Enter the name of your company or organization. Example: Quick Oracle.

Country (C): Select your country from the drop-down list.

Custom DN: If your DN uses attributes not listed in the Typical DN section, specify your DN in this section.

Click Next.

3. Select OCA Key Length

Key Length (bits): Select the key length used in RSA algorithm to sign all certificates issued by OCA. Oracle recommends that you use at least a 2048-bit key length. Longer key lengths provide greater security, but require more time to issue each new certificate.

Click Next.

4. Specify OCA Administrator's Password

Administrator's Password and Confirm Password: Specify and confirm the password for the OCA administrator.

You need this password to manage OCA. This password is also used by the OCA Configuration Assistant.

You can change the password after installation using the ocactl command.

Click Next.

Overview of Oracle Identity Management 10g (10.1.4.0.1)

In todays post I am going to discuss about Oracle Identify Management 10g (10.1.4.0.1).

Source: Oracle Documentation

http://www.download.oracle.com

Oracle Application Server is made up of a middle tier and OracleAS Infrastructure. You deploy and run your applications on the middle tiers. The infrastructure provides services that are used by middle tiers. These services can be shared by one or more middle tiers.

Oracle Application Server 10g (10.1.4.0.1) provides a comprehensive Identity and Access Management solution. The Identity and Access Management Suite includes:

a)Oracle Internet Directory: Provides scalable, robust LDAP V3-compliant directory services implemented on the Oracle Database.

b)Oracle Identity Federation: Provides standards-based, multi-protocol, and cross-domain single sign-on.

c)Oracle Security Developer Tools: Provides a APIs for developing federation and secure web services applications.

d)Oracle Access Manager: Provides a state-of-the-art solution for centralized identity administration and access control.

e)Oracle Identity Manager: Provides a powerful and flexible enterprise identity management system that automatically manages users' access privileges within enterprise IT resources.

f)Oracle Virtual Directory: Provides Internet and industry-standard LDAP and XML views of existing enterprise identity information, without synchronizing or moving data from its native locations.

In addition to the Identity and Access Management Suite, this release provides a revision of OracleAS Infrastructure, which includes the following Oracle Identity Management components and OracleAS Metadata Repository:

a) Oracle Internet Directory: A scalable, robust LDAP V3-compliant directory service implemented on the Oracle Database.

b) Oracle Directory Integration Platform: A component of Oracle Internet Directory designed to perform directory synchronization with third party directory products.

c) Oracle Application Server Certificate Authority: A component that issues, revokes, renews, and publishes X.509v3 certificates to support PKI-based strong authentication methods.

d) Oracle Application Server Single Sign-On (OracleAS Single Sign-On): Provides single sign-on access to Oracle and th ird-party Web applications.

e) Oracle Delegated Administration Services: Provides trusted proxy-based administration of directory information by users and application administrators.

f)OracleAS Metadata Repository: Provides a collection of schemas used by other Oracle Application Server components.

g) Oracle Enterprise Manager 10g Application Server Control Console: Enables you to manage and configure the OracleAS Infrastructure.

Note:1)You can integrate Oracle Application Server 10g (10.1.4.0.1) Identity Management with an existing Oracle Application Server environment that includes:

10g (9.0.4), 10g Release 2 (10.1.2), or 10g Release 3 (10.1.3) middle tier

10g (9.0.4) or 10g Release 2 (10.1.2) OracleAS Metadata Repository

2) You can integrate Oracle Application Server 10g (10.1.4.0.1) Metadata Repository with an existing Oracle Application Server environment that includes:

10g Release 2 (10.1.2) middle tier

10g (9.0.4) or 10g Release 2 (10.1.2) Identity Management


10.1.4.0.1 OracleAS Infrastructure Topologies - Recommended Topologies

1) An Oracle Application Server instance containing all Oracle Identity Management components in one Oracle home.

2)Two Oracle Homes, one containing Oracle HTTP Server, OracleAS Single Sign-On, and Oracle Delegated Administration Services. and the other containing Oracle Internet Directory and Oracle Directory Integration Platform.

3)Three Oracle Homes, one containing Oracle HTTP Server, a second containing OracleAS Single Sign-On and Oracle Delegated Administration Services. and a third containing Oracle Internet Directory and Oracle Directory Integration Platform.

4) An enterprise data center for J2EE applications that uses one of the following methods for user authentication:

OracleAS Single Sign-On

Oracle Access Manager

Oracle Application Server Java Authentication and Authorization Service (JAAS) Provider LDAP

Each of these topologies contains a web tier, an application tier, and a data tier. The three tiers are separated by firewalls.


Oracle Identity Federation Topologies

- An Oracle Identity Federation instance configured with OracleAS Infrastructure so that it is integrated with OracleAS Single Sign-On.

- An Oracle Identity Federation instance configured with OracleAS Infrastructure and Oracle Access Manager


High-Availability Topologies

- An OracleAS Cluster (Identity Management) configuration in which two or more Oracle Identity Management instances serve the same content. A load balancer distributes requests equally among the active instances.

- An OracleAS Cold Failover Cluster configuration in which two or more OracleAS Infrastructure or Oracle Identity Management instances serve the same content, but only one instance is active at any one time.

- An OracleAS Disaster Recovery configuration in which a standby site mirrors a production site. During normal operation, the production site handles all the requests. If the production site goes down, the standby site takes over and handles all the requests.

- An active-active topology in which two or more Oracle Access Manager instances serve the same content. A load balancer distributes requests equally among the active instances.

- An OracleAS Cold Failover Cluster configuration in which two or more Oracle Identity Federation instances serve the same content, but only one instance is active at any one time.

- OracleAS Cold Failover Cluster or Real Application Clusters configurations for OracleAS Metadata Repository.


10.1.4.0.1 OracleAS Infrastructure with Existing 10.1.2 or 10.1.3 Environments


10.1.2 or 10.1.3 Middle Tiers: Configure a 10g Release 2 (10.1.2) or 10g Release 3 (10.1.3) middle-tier instance to use a new 10g (10.1.4.0.1) OracleAS Infrastructure.

This topology also supports associating a 10g Release 2 (10.1.2) or 10g Release 3 (10.1.3) middle-tier instance with a new 10g (10.1.4.0.1) Oracle Identity Management for the following scenarios:

Moving to a new host

Creating a failover environment

Moving applications from a test environment to a new production environment

Step by Step Installation Guide of Oracle Application Server 10g Release 3 (10.1.3.1.0) on Linux x86 (CentOS 3)

Source: Oracle Documentation : http://www.tahiti.oracle.com


This step by step guide of installing Oracle Application Server 10g Release 3 for Education Purpose and testing the product for Evaluation Purpose.

Oracle Application Server 10g Release 3 (10.1.3.1.0) provides the Oracle SOA Suite, which is a complete set of service infrastructure components for creating, deploying, and managing Service Oriented Architectures. Oracle SOA Suite enables services to be created, managed, and orchestrated into composite applications and business processes.

Oracle SOA Suite consists of:

A) Oracle BPEL Process Manager

B) Oracle Enterprise Service Bus (ESB)

C) Oracle Web Services Manager (OWSM)

D) Oracle Business Rules

Oracle Application Server (includes Oracle HTTP Server, Oracle Containers for J2EE (OC4J or J2EE Server), Oracle Enterprise Manager 10g Application Server Control, Oracle Process Manager and Notification Server and OC4J Java Single Sign-On)

You can integrate Oracle Application Server 10g Release 3 (10.1.3.1.0) with an existing Oracle Application Server environment that includes 10g Release 2 (10.1.2) or 10g (10.1.4.0.1) OracleAS Infrastructure.

I will cover 10g Oracle AS Infrastructure in my next post.


Download the Software

- CentOS
- RedHat Linux

http://www.centos.org/
https://www.redhat.com/apps/download/

Note:Red Hat Enterprise Linux AS/ES 3.0, 4.0 and SUSE Linux Enterprise Server 9 are certified and supported

- Oracle Application Server 10g Release 3

http://www.oracle.com/technology/software/products/ias/index.html

Step 1: Installing Linux (CentOS/RedHat Advanced Server)

Disk space

Basic Installation: J2EE Server and Oracle SOA Suite: 1 GB

Advanced Installation: J2EE Server, Web Server, and Oracle SOA Suite: 1.05 GB

Advanced Installation: J2EE Server and Web Server: 650 MB

Advanced Installation: J2EE Server: 625 MB

Advanced Installation: Web Server: 500 MB

Memory for Basic Installation: 512 MB

grep MemTotal /proc/meminfo


Processor Speed (32-bit) : 300 MHz or faster

cat /proc/cpuinfo | grep MHz


Supported browsers:

Oracle Enterprise Manager 10g is supported on the following browsers:

Microsoft Internet Explorer 6.0 SP2 (supported on Microsoft Windows only)

Netscape 7.2

Mozilla 1.7. You can download Mozilla from http://www.mozilla.org.

Firefox 1.0.4. You can download Firefox from http://www.mozilla.org.

Safari 1.2, 2.0 (on Apple Macintosh computers)


RedHat Advanced Server/CentOS3

Note: There will screen selection difference in various flavour of Linux distribution but step are almost common.

1. Boot the server using the first CD.
- You may need to change your BIOS settings to allow booting from the CD.
2. The boot screen appears with the boot: prompt at the bottom of the screen.
- Select Enter to continue with a graphical install on the console. (For other installation methods and options
- The installer scans your hardware, briefly displays the Red Hat splash screen, and then begins a series of screen prompts.
3. Language Selection
- Accept the default.
4. Keyboard Configuration
- Accept the default.
5. Welcome Screen
- Click on Next.
6. Disk Partitioning Setup
-Use ext3 for each filesystem:

The 10GB disk on the first controller (/dev/sda) will hold all Linux and Oracle software and contains the following partitions:
- 100MB /boot partition
-2,000MB swap partition.
-7,900 MB root partition
Boot Loader Configuration
- Accept the default.
7. Network Configuration
- It is usually best to configure application servers with a static IP address. To do so, click on Edit .
- A pop-up window appears. Uncheck the Configure using DHCP box, and enter the IP Address and Netmask for the server. Be sure that Activate on boot is checked, and click on OK .
- In the Hostname box, select manually and enter the hostname.
- In the Miscellaneous Settings box, enter the remaining network settings.
8. Firewall Configuration
- For the purposes of this walk-through, no firewall is configured.
Select No firewall
- Select Disabled on the "Enable SELinux" drop down list.
- Click on Proceed when the "Warning - No Firewall" window appears.
9. Additional Language Support
- Accept the default.
10. Time Zone Selection
Choose the time settings that are appropriate for your area. Setting the system clock to UTC is usually a good practice for servers. To do so, click on System clock uses UTC.
11. Set Root Password
- Enter a password for root, and enter it again to confirm.
12. Package Installation Defaults
- Select Customize software packages to be installed.
13. Package Group Selection
- Select only the package sets shown here and leave all others unselected.
- Desktop
- X Window System
- Gnome
- Applications
- Graphical Internet (optional)
- Servers
- Do not select anything in this group.
- Development
- Development Tools
- System
- Administration Tools
- System Tools
- Add the package 'sysstat' by clicking on the Details link and selecting "sysstat - The sar an iostat system monitoring commands." from the Optional Packages list.
- Miscellaneous
- Do not select anything in this group.
- Click on Next to proceed.
14. Installing Packages
- Software will be copied to the hard disk and installed. Change disks as prompted.
15. Congratulations
- Remove the installation media from the system, and click on Reboot .
16. The system automatically reboots and presents a new welcome screen.
- Click on Next.
17. License Agreement
- Read the license agreement. If you agree to the terms, select Yes, I agree to the License Agreement and click on Next.
18. Date and Time
- Set the Date and Time.
- If you want to use an NTP server (recommended), select Enable Network Time Protocol and enter the name of the NTP server.
19. Display
- Accept the defaults or change as required.
20. Red Hat Login
- Enter your Red Hat Network login and password or create a new one.
21. System User
- Create an account for yourself.
- Do not create an account for oracle at this time. Creating the oracle account is covered later in this section.
22. Additional CDs
- Click on Next.
23. Finish Setup
- Click on Next.
24. A graphical login screen appears.
25. Congratulations! Your Linux software is now installed.

Verifying Your Installation

Once you've completed the steps above, all of the packages required for Oracle Application Server 10g Release 3 will have been installed. Verify this using the example below.

Required package versions (or later):

http://download.oracle.com/docs/cd/B31017_01/linux.1013/install/reqs.htm#CIHEFBJD

glibc-2.3.2-95.27
glibc-common-2.3.2-95.27
glibc-2.3.4-2.9
glibc-common-2.3.4-2.9
binutils-2.14.90.0.4-35
compat-glibc-7.x-2.2.4.32.6
compat-libstdc++-7.3-2.96.128
compat-libstdc++-devel-7.3-2.96.128
compat-db-4.0.14-5
compat-db-4.1.25-9
compat-libstdc++-devel-7.3-2.96.128
compat-glibc-7.x-2.2.4.32.6
compat-libstdc++-7.3-2.96.128
control-center-2.8.0-12
gcc-3.2.3-42
gcc-c++-3.2.3-42
gcc-3.4.3-22.1
gcc-c++-3.4.3-22.1
libstdc++-3.2.3-42
libstdc++-devel-3.2.3-42
openmotif21-2.1.30-8
pdksh-5.2.14-21
setarch-1.3-1
make-3.79.1-17
gnome-libs-1.4.1.2.90-34.1
sysstat-4.0.7-4.EL3.3
binutils-2.15.92.0.2-13
compat-libstdc++-296-2.96-132.7.2
libstdc++-3.4.3-22.1
libstdc++-devel-3.4.3-22.1
openmotif21-2.1.30-11.RHEL4.4
pdksh-5.2.14-30
setarch-1.6-1
make-3.80-5
gnome-libs-1.4.1.2.90-44.1
sysstat-5.0.5-1
xscreensaver-4.18-5.rhel4.2

Create the following symbolic links:

ln -sf /usr/bin/perl /usr/local/bin/perl
ln -sf /bin/fuser /sbin/fuser

Step 2: : Oracle Environment Configuration on Linux operating system RedHat/CentOS

a) Verifying System Requirements (pre-req’s)

To verify that your system meets the minimum requirements for a Oracle Application Server 10g Release 3, log in as root and run the commands below.

To check the amount of RAM and swap space available, run this:

grep MemTotal /proc/meminfo
grep SwapTotal /proc/meminfo

The minimum RAM required is 512MB, and the minimum required swap space is 1024MB. Swap space should be twice the amount of RAM for systems with 2GB of RAM or less and between one and two times the amount of RAM for systems with more than 2GB.

b) Configure host information in /etc/hosts file

Note: hosts file must contain fully qualified name

Example : /etc/hosts

192.168.100.2 lnxas1.quickoracle.com lnxas1

Note:

Edit /etc/hosts to remove "localhost" from the IPV6 address list.

Before:
# special IPv6 addresses
::1 localhost ipv6-localhost ipv6-loopback

After:
# special IPv6 addresses
::1 ipv6-localhost ipv6-loopback

c) Define Shell limits for user oracle

Enter the information at the end of /etc/security/limits.conf file

oracle soft nproc 2047
oracle hard nproc 16384
oracle soft nofile 2048
oracle hard nofile 65536


d) Enter the information to /etc/pam.d/login

Session required /lib/security/pam_limits.so

Note: Ref to Oracle documentation of Oracle AS 10g Release states that default values are good for Kernel parameters.

e) Directories Creation

mkdir -p /d01/app/oracle/product/10.1.3
chown -R oracle.oinstall /d01

f) Oracle Group and User Account creation at operating system level

groupadd oinstall
groupadd dba
groupadd oper
useradd -g oinstall -G dba -s /bin/ksh oracle
passwd oracle

g) Login to system as root user and run the below command:

xhost +

h) Login as oracle user and add the below lines in your /etc/.bash_profile or /etc/.profile

#TMP Environment variable for Oracle

TMP=/tmp; export TMP
TMPDIR=$TMP; export TMPDIR

ORACLE_BASE=/d01/app/oracle; export ORACLE_BASE
ORACLE_HOME=$ORACLE_BASE/product/10.1.3/OracleAS_1;
export ORACLE_HOME
ORACLE_TERM=xterm; export ORACLE_TERM
PATH=/usr/sbin:$ORACLE_HOME/bin:$PATH; export PATH
PATH=$PATH:$ORACLE_HOME/dcm/bin:$ORACLE_HOME/opmn/bin; export PATH
PATH=$PATH:$ORACLE_HOME/Apache/Apache/bin; export PATH

if [ $USER = "oracle" ]; then
if [ $SHELL = "/bin/ksh" ]; then
ulimit -p 16384
ulimit -n 65536
else
ulimit -u 16384 -n 65536
fi
fi


Note:Comment out the ANT_HOME line from the "/etc/ant.conf" file or if file present then give some other name so that system will not look for this file.

Step 3: Oracle Application Server 10g R3 Installation (Software Installation)

a) Create the Stage directory.

mkdir Stage10gASR3

b) Place the downloaded Software cpio file in Stage Directory and Extract the files as oracle user

cpio -idmv < as_linux_x86_101300_disk1.cpio

c) Install the Application Server Software
Log in using the oracle account.
Change directory to the location where you extracted the Oracle Application Server 10g Release 3 software.

$ cd $HOME/StageAS10gR3

d) Before running the Oracle Univeral Installer export the Display
DISPLAY=:0.0; export DISPLAY

e) Start the Oracle Universal Installer.

$. /runInstaller

1. Oracle Application Server 10g 10.1.3.0.0 Installation
- Installation Directory: /d01/app/oracle/product/10.1.3/OracleAS_1
- Select Basic Installation
- Installation Type: Integrated Webserver, J2EE Server, Process Management
- Instance Name: prodapp
- Administration Name: oc4jadmin (cannot be changed)
- Administration Password: Enter a password and confirm
- Click on Install

2. Specify Inventory Directory and Credentials

- Inventory Directory: /d01/app/oracle/oraInventory
- Operating System group name: oinstall
- Click on Next
- Run the indicated script as root and click on Continue

3. Product-specific Prerequisite Checks

- Click on Next
- Dismiss the Warning window that may appear regarding installed physical memory by clicking on OK.

4. Install

- Watch the installation process

5. Configuration Assistants

- The configuration assistants should succeed without any action on your part.

6. Setup Privileges

- At the end of the installation, a pop up window will appear indicating that a script needs to be run as root. Login as root and run the indicated script.
- Click on OK when finished.

7. End of Installation

- Make note of the URLs presented in the summary, and click on Exit when ready.

Friday, December 7, 2007

Step by step Guide to Setup the SOA Applications

In this post I am going to cover Installing the required pre-reqs for SOA Application and setting up the application itself.

-- Verify Installation pre-requisites

This step will cover prerequisites software installations steps.Skip if the prerequisites are already taken care by you.

Step a: Install an Oracle Database

You need 9i,10g,Oracle Lite or XE as part of you datbase installation.

Download:http://www.oracle.com/technology/products/xe/index.html

Step b: Install JDeveloper Studion 10.1.3.1.0 (Studio Editon not the J2EE or Java Edition)

You need to Installation JDeveloper to use the design-time enviornment or based on your customzied application requirement.

Download: http://www.oracle.com/technology/products/jdev/index.html

Note: Please don't confused with JDeveloper versoin 10.1.3.0.0.

Step c: Install Oracle SOA Suite 10.1.3.1.0

Quick start Installation of SOA 10.1.3.1.0

Note before begining the Installation of SOA Suite:

-The AS Instance Name is soatest.
-The AS Administrator Password is test1234.
-The default port is 8888.

1.To download Oracle SOA Suite 10.1.3.1.0:

http://www.oracle.com/technology/soa

2.Install Oracle SOA Suite 10.1.3.1

3.When you install Oracle SOA Suite follow the below steps
- Select Basic Install.
- Set the AS Instance Name to soatest.
- Set the AS Administrator Password to test1234.

Special Note:

The Oracle SOA Suite installation sets the ORACLE_HOME environment variable for your computer. In some cases, this setting can cause a conflict with the Oracle Database. Specifically you may get errors from your Oracle Net Listener. If this is the case, then reset the ORACLE_HOME environment variable to your database location. On Windows, you may need to restart your PC.

Step d:Install the SOA applications:

Ask your development team to provide you the User application in zip format and unzip the application in a folder which is meaningful.


--Steps for Setting up the SOA User Applicaion:

Step 1: Install Oracle Database Schema
Step 2: Configure Oracle SOA Suite
Step 3: Note the Name of the OC4J Instance Running the Oracle BPEL Server
Step 4: Note the Important Port Numbers
Step 5: Create Connections in JDeveloper
Step 6: Install and Deploy the SOA User Application
Step 7: Configure the ESB Port
Step 8: Familiarize Yourself with User Application and related Schema

Uses the following references:

JDEV_HOME refers to the location of the your JDeveloper installation
ORACLE_HOME refers to the location of the your Oracle SOA Suite installation.
APPS_HOME refers to the location where you unzipped the SOA User Application ZIP file.

Friday, November 30, 2007

SOA Architecture


SOA Architecture

Source:Oracle Documentation

http://tahiti.oracle.com


Oracle SOA Suite is a complete set of service infrastructure components for creating,deploying and managing services. Oracle SOA Suites enables services to be created,managed, and orchestrated into composite applications and business processes.

Additionally you can adopt it incrementally on a project by project basis and still benefit from the common security,management,deployment architecture and development tools that you get out of box.

Oracle SOA Suite is a standard-based best-of-breed technology suite that consists of the following

1) Integrated Service Environment (ISE) to develop services
2) Oracle BPEL Process Manager to orchestrate services into business processes
3) ESB to connect exisiting IT systems and business partners as a set of services
4) Oracle Business Rules for dynamic decisions at runtime that can be managed by business users or business analysis.
5) OracleAS Integration Business Activity Monitoring to monitor services and disparte events and provide real-time visibility into the state of the enterprise,business processes,people and systems
6) Oracle web services manager to secure and manage authentication,authrization,and encryption policies on services that is separate from you service logic.
7) UDDI registry to discover and manage the lifecycle of web services.
8) Oracle Application server 10g Release (10.1.3) to provide a complete Java 2 Enterprise Edition (J2EE) 1.4-compliant for your J2EE applications.


In my next post you will learn how to setup a SOA applicaiton which includes installation of SOA Suites.

Monday, November 26, 2007

Version Info - Oracle Applicaton Server ,Fusion Middleware and Collaboration Suite

Version information of Oracle Applicaton Server ,Fusion Middleware and Collaboration Suite. I will focus on latest versions in my blog. You can find the documentation on http://tahiti.oracle.com.


Oracle Applicaton Server and Fusion Middleware:

Oracle 9i AS (Release 9.0.2)

Oracle Application Server 10g(Release 9.0.4)

Oracle Application Server 10g (Release 10.1.2)

Oracle Application Server 10g (Release 10.1.3)

Oracle Identity Management 10g (Release 10.1.4)

Oracle Collaboration Suite:

Oracle Collaboration Suite Release 10g (10.1.2)

Oracle9 Collaboration Suite Release 9.0.4.

Oracle9 Collaboration Suite Release 9.0.3.

Sunday, November 25, 2007

Troubleshooting the Oracle Cluster Registry

In this post, you will come to know about Troubeshooting the OCR.

Topics:
a)OCRCHECK Utility
b)Resolution of common problems with OCR

a)OCRCHECK Utility:

- displays the data block format version used by the OCR.
- OCR free and used space.
- the ID used by OCR and the locaiton where you configured the OCR.
- Verify the integrity of each block. It calculates for all data blocks in the OCR's.
- It return the individual status each OCR's and overall OCR integrity check.

OCRCHECK utility log file location:

$CRS_HOME/log/hostname/client/orcheck_nnnnn.log

Note:nnnnn is the process ID of the operating session that issued the ocrcheck command

b)Resolving Common Oracle Cluster Registry Problems

Ref Oracle Clusterware Documentation: http://download.oracle.com/docs/cd/B19306_01/rac.102/b28759/adminoc.htm#BEJIEABC

Administer the Oracle Cluster Registry

The OCR contains information about the cluster node list, which instances are running on which nodes, and information about Oracle Clusterware resource profiles for applications that have been modified to be managed by Oracle Clusterware.

In this post, I am going to discuss about how to Administer the OCR:

Topics:
a)Adding an OCR Location
b)Replacing an OCR
c)Repairing an Oracle Cluster Registry Configuration on a Local Node
d)Removing an Oracle Cluster Registry

Note:ocrconfig command cannot modify OCR configuration information for nodes that are shut down or for nodes on which Oracle Clusterware is not running. So, you should avoid shutting down nodes while modifying the OCR using the ocrconfig command.


a)Adding an OCR Location

OCR location can be added after upgrade or after Installation of RAC. Oracle RAC environment do not support more then two OCR's (Primary and Secondary). In your enviornment if the the OCR is already mirror you do not require to add an OCR location. It is important to note that if you opted for normal redundancy instead of external redudancy,Oracle Clustware can manage two OCR's automatically.

Target location for additional OCR can be a desitnation_file or a disk.

ocrconfig -replace ocr destination_file
ocrconfig -replace ocr disk

To add a mirror OCR location

ocrconfig -replace ocrmirror destination_file
ocrconfig -replace ocrmirror disk

Note: Use above command as root user.

b)Replacing an OCR: You can change the location of an existing OCR or change the location of failed OCR to the location of working one. Follow the below steps as long as OCR file remains online.

1. verify that a copy of the OCR other than the one you are going to replace is online:

ocrcheck

Note:The OCR that you are replacing can be either online or offline

2. Verfiy if the Oracle clusteware is running on the node where the replace operatoin will be performed.

crsctl check crs

3. Replace the OCR (using destination_file or disk)

ocrconfig -replace ocr destination_file
ocrconfig -replace ocr disk

4. To replace an OCR mirror location (using destination_file or disk)

5. To let that node rejoin the cluster after the node is restarted where the node was shutdown/stopped.

ocrconfig -repair

c)Repairing an Oracle Cluster Registry Configuration on a Local Node

To repair an OCR configuration on the node on which you have stopped the Oracle Clusterware daemon.


ocrconfig –repair ocrmirror device_name

Note:Node that was shut down while you were adding, replacing, or removing an OCR.You cannot perform this operation on a node on which the Oracle Clusterware daemon is running.This operation changes the OCR configuration only on the node from which you run this command.

d)Removing an Oracle Cluster Registry

Do not perform this OCR removal procedure unless there is at least one active OCR online

1. To ensure that at least one OCR other than the OCR that you are removing is online

ocrcheck
2. To remove one copy of the OCR

ocrconfig -replace ocr

Note: Run the above command on any node in the cluster.It updates the OCR configuration on all the nodes on which Oracle Clusterware is running.

Oracle 10gR2 - Oracle Clusteware World


Source: Oracle Clusteware documentation (http://tahiti.oracle.com)


Oracle Clusterware Configuration

Note:1)Oracle Clusterware supports up to 100 nodes in a cluster on configurations running Oracle Database 10g Release 2 and later releases
2)Cluster-aware storage may also be referred to as a multihost device.

Terms used in this post:

RAC: Real Application Clusters
OCR: Oracle Cluster Registry
CRS: Cluster Ready Service

Oracle Real Application Clusters (Oracle RAC) uses Oracle Clusterware as the infrastructure that binds together multiple nodes that then operate as a single server. Oracle Clusterware is a portable cluster management solution that is integrated with Oracle Database. In an Oracle RAC environment, Oracle Clusterware monitors all Oracle components (such as instances and Listeners). If a failure occurs, Oracle Clusterware automatically attempts to restart the failed component and also redirects operations to a surviving component.

Oracle Clusterware includes two important components: the voting disk and the OCR. The voting disk is a file that manages information about node membership, and the OCR is a file that manages cluster and Oracle RAC database configuration information.The Oracle Clusterware installation process creates the voting disk and the OCR on shared storage

Oracle Clusterware processes on Linux and UNIX systems include the following:

crsd—Performs high availability recovery and management operations such as maintaining the OCR and managing application resources. This process runs as LocalSystem. This process restarts automatically upon failure.

evmd—Event manager daemon. This process also starts the racgevt process to manage FAN server callouts.

ocssd—Manages cluster node membership and runs as the oracle user; failure of this process results in a node restart.

oprocd—Process monitor for the cluster. Note that this process only appears on platforms that do not use third-party vendor clusterware with Oracle Clusterware.


When to Backup up Voting Disks:

1) After Installation
2) After adding nodes to or deleting nodes from the cluster
3) After performing voting disk add or delete operations

Syntax to backing up Voting Disk using dd command:

dd if=voting_disk_name of=backup_file_name

Use device name when the voting disk is reside on raw partition

dd if=/dev/sde1 of=/tmp/voting.dmp

Note: There is no need to stop CRS (dameon - crsd.bin) before taking the backup of Voting Disk.

Voting Disk Recovery from Backup:

dd if=backup_file_name of=Active_voting_disk_name

Add and Remove Voting Disk:

You can dynamically perform add and removal of Voting Disk after installation of RAC.

As a root user add a Voting Disk:

crsctl add css votedisk path

As a root user remove a Voting Disk:

crsctl delete css votedisk path

Note:a)where path is the fully qualified path for the additional voting disk.
b)-force option should not be used when the cluster node is active. -force option to modify the voting disk when either of these commands when the Oracle clusteware dameon is not active (crsd.bin).
c)Oracle Clusterware automatically creates OCR backups every 4 hours. At any one time, Oracle Clusterware always retains the latest 3 backup copies of the OCR that are 4 hours old, 1 day old, and 1 week old. You can use other backup software to keep a copy of OCR backup generated automatically on a different device at least once a daily.


Viewing Available OCR Backups:

To check the most recent backup on any node of cluster:

ocrconfig -showbackup


Backing Up the OCR

ocrconfig tool to make copies of the automatically created backup files at least once a day. You should be loggin as root to use ocrconfig tool.


OCR contents export to a file in case of configuration changes causes erros:

ocrconfig -export backup_file_name

Recovering the OCR

Before you proceed with recovering the OCR you should ensure that OCR is unavailable.

There are two methods for recovering the OCR.

a) automatically generated OCR file copies.
b) manually created OCR export files.

Ensure that the OCR is unavailable:

ocrcheck

The above command should display the result as 'Device/File integrity check succeeded' for atleast one copy of OCR . If not then your primary and the OCR mirror have failed. The only option left is to resotre from the backup.

a)Restoring the OCR (First method mentioned above):

1.Check if the backup is available

# ocrconfig -showbackup

2. Verify the contents of OCR backup

ocrdump -backupfile backup_file_name
3. Stop the clustware on all RAC nodes (as root)

crsctl stop crs ( run this command on all RAC nodes as root)
4. Restore from the OCR backup (as root0

ocrconfig -restore backup_file_name

5. Start the Oracle clusterware after restore

# crsctl start crs (run this command on all RAC nodes as root)

6. verify the OCR integrity after restore

$ cluvfy comp ocr -n all [-verbose]
Note: -n all argument retrieves a list of all the cluster nodes that are configured as part of your cluster.

b)Recovering the OCR (Second Method mentioned above)

1. Keep the OCR export file to a accessible directory.

ocrconfig -export

2. Stop the Oracle Clusterware

crsctl stop crs (run this command on all nodes of cluster as root)

3. Import the contents from backup OCR export file

ocrconfig -import export_file_name

4. Start the Oracle Clusterware

crsctl start crs (run this command on all nodes of cluster as root)

5. Verify OCR Integrity after restore

cluvfy comp ocr -n all [-verbose]
Note: a)-n all argument retrieves a list of all the cluster nodes that are configured as part of your cluster.
b)You cannot use the ocrconfig command to import an OCR backup file