Oracle Application 11.5.9CU2 upgrade to Oracle application R12.1.3. This upgrade includes upgrade from Portal 3.0.9 , Portal Login server/SSL to Portal 10g/SSO/SSL. Also database upgrade from 9.2.0.7 to 10.2.0.4 patchset. Also I am going to discuss about various paths to upgrade to R12..
The most important aspect of the upgrade to assess you current EBS 11i system techinically and functionally.
Here in the article will be going to cover the technically aspect but will give some guidance on functional aspect.
On Hold.
Sunday, October 12, 2008
Tuesday, August 12, 2008
Step by Step Information on R12 - How to Validate APPS Schema
In day to day activity DBA's encounter issues related to invalid objects. Common solution to the problem is running adadmin utility and utlrp script. In this post we are going to discuss invalid APPS schema not objects.
Now the question must be in your mind in what situations you really needs to validate the APPS Schema.
Here we go....
If face any problem with AD_DDL package at runtime
When patch is applied. You can run this only once even you apply more then one patches at a time.
If you upgraded Oracle applications or applied Maintenance pack
After migration using export/import
After Custom development of APPS Schema
Methods to validate APPS Schema
On Unix:
1. Run system/passowrd @$AD_TOP/admin/sql/advrfapp.sql
2. Using adadmin utility and opt for "1. Validate APPS Schema" under "Maintain Applications Database Entities".
Steps to Validate APPS Schema
1.Run adadmin utility. Select the option "Maintain Applications Database Entities" from main menu of AD Administration.
2.Select "Validate APPS Schema" from sub-menu of "Maintain Applications Database Entities".
3. Now review the output file located at $APPL_TOP/admin/SID/out. The report name will be.lst. Look for any missing or invalid pacakges , synonyms or invalid objects in APPS schema. Also check and verify for table or sequences in APPS and base schema. Follow the instruction in the file to resolve any issues.
Hope this helps.
Now the question must be in your mind in what situations you really needs to validate the APPS Schema.
Here we go....
Methods to validate APPS Schema
On Unix:
1. Run system/passowrd @$AD_TOP/admin/sql/advrfapp.sql
2. Using adadmin utility and opt for "1. Validate APPS Schema" under "Maintain Applications Database Entities".
Steps to Validate APPS Schema
1.Run adadmin utility. Select the option "Maintain Applications Database Entities" from main menu of AD Administration.
2.Select "Validate APPS Schema" from sub-menu of "Maintain Applications Database Entities".
3. Now review the output file located at $APPL_TOP/admin/SID/out. The report name will be
Hope this helps.
Wednesday, July 23, 2008
Step by Step Information on Oracle Applications R12 Control Scripts
In this post you will come to know about Oracle Applications Control Scripts. It is very important for an APPS DBA to know the location and its usage while handling APPS DBA duties.
The application Tier server process control scripts are used to start and stop server processes on the applications tier like adcmctl.sh (Concurrent manager start/stop control script) and adapcctl.sh (HTTP Server start/stop control script).
The following question can be arise in your mind regarding control scripts on Application Tier.
Now you will think where this control scripts are located in Application Tier
How these control scripts are created.
Is it possible to recreate these control scripts.
Here you go...The answer to the above queries are...
Control scripts are located in the $ADMIN_SCRIPTS_HOME (i.e, $INST_TOP/admin/scripts) directory. It is created by Rapid Install during the installation and you can recreate using AutoConfig (i.e,adautocfg.sh control script) as and when required.
The syntax of the control scripts is [stop or start]
$./adalnctl.sh stop (To stop the Apps Listener)
$./adalnctl.sh start (To start the Apps Listener)
You can use other Application Tier server process control scripts for all server processes to stop and start at the same time.
$./adstrtal.sh (Apps username/password)
$./adstpall.sh (Apps username/password)
To stop or start Forms server in socket mode.
$./adfrmsrvctl.sh
To stop or start Forms OC4J instance in servlet mode.
$./adfrmctl.sh
To stop or start Application Listener.
$./adalnctl.sh
To stop or start concurrent managers.
(This control script required the APPS username and password).
$./adcmctl.sh
To stop or start the HTTP server.
$./adapcctl.sh
Hope you like this post. Please let me know what Topic you would like to see on my blog. Based on request I will start including other stuff too. I am taking my family time to write these articles so I will be on / off from the blogs. You inputs are highly appreciated to improve my blog.
The application Tier server process control scripts are used to start and stop server processes on the applications tier like adcmctl.sh (Concurrent manager start/stop control script) and adapcctl.sh (HTTP Server start/stop control script).
The following question can be arise in your mind regarding control scripts on Application Tier.
Here you go...The answer to the above queries are...
Control scripts are located in the $ADMIN_SCRIPTS_HOME (i.e, $INST_TOP/admin/scripts) directory. It is created by Rapid Install during the installation and you can recreate using AutoConfig (i.e,adautocfg.sh control script) as and when required.
The syntax of the control scripts is
$./adalnctl.sh stop (To stop the Apps Listener)
$./adalnctl.sh start (To start the Apps Listener)
You can use other Application Tier server process control scripts for all server processes to stop and start at the same time.
$./adstrtal.sh
$./adstpall.sh
To stop or start Forms server in socket mode.
$./adfrmsrvctl.sh
To stop or start Forms OC4J instance in servlet mode.
$./adfrmctl.sh
To stop or start Application Listener.
$./adalnctl.sh
To stop or start concurrent managers.
(This control script required the APPS username and password).
$./adcmctl.sh
To stop or start the HTTP server.
$./adapcctl.sh
Step by Step Information on Oracle Application R12 Environment files - Part 2
I started in my last post about environment files..
In todays post I am going to discuss some more environment files which an APPS DBA should know.
adovars.env file
adovars.env file which is located under $APPL_TOP/admin, and called from <CONTEXT_NAME.env>. This files specifies various types of file location using various environment variables like
JAVA_TOP -> All java files are copied here and it is the top-level directory
CLASSPATH -> It lists the directories and zip file for java class files needed at runtime.
OA_JRE_TOP -> JRE installation location.
OAD_TOP -> Context-sensitive documentation files are copied at this location.
LD_LIBRARY_PATH -> To list the directories for dyanmic library files needed at runtime.
OAH_TOP -> HTML files are copied at this location.
fndenv.env File
This default values should not be modified of this file. This file is located under $FND_TOP direcotry. It sets additional environment varialbes used by Oracle AOL (i.e, Applcation Object Library).
devenv.env file
This file is located under $FND_TOP and is called by fndenv.env for the purpose of compile and link custom Oracle Forms user exits and concurrent program with Oracle Applications. It sets variable that help you link third-party software and your own custom applications with Oracle Applications.
adconfig.txt File
This file is located under $APPL_TOP/admin directory and AD utility perform a variety of database and file management task for which they require acces to specific configuration information. This information is specified when Oracle Application is installed. It is stored in the adconfig.txt file.
Hope this helps to my blog reader community.
In todays post I am going to discuss some more environment files which an APPS DBA should know.
adovars.env file which is located under $APPL_TOP/admin, and called from <CONTEXT_NAME.env>. This files specifies various types of file location using various environment variables like
This default values should not be modified of this file. This file is located under $FND_TOP direcotry. It sets additional environment varialbes used by Oracle AOL (i.e, Applcation Object Library).
This file is located under $FND_TOP and is called by fndenv.env for the purpose of compile and link custom Oracle Forms user exits and concurrent program with Oracle Applications. It sets variable that help you link third-party software and your own custom applications with Oracle Applications.
This file is located under $APPL_TOP/admin directory and AD utility perform a variety of database and file management task for which they require acces to specific configuration information. This information is specified when Oracle Application is installed. It is stored in the adconfig.txt file.
Hope this helps to my blog reader community.
Wednesday, July 16, 2008
Step by Step Information on Oracle Application R12 Environment files - Part 1
Received numerous emails from my blog readers to start working on blog. Thanks for all of your appreciation ,support and encouragement to start again. My todays post will be based on Oracle Application R12. As I received request from my blog reader to continue with the series of R12. I will continue with R12 articles also going to cover other areas like Database 11g, Oracle Application server, SOA suites etc in my future posts. In this post I am going to discuss about R12 Oracle Environment files.
Environment Files and Control scripts:
Environment files are in place to manage the setup and configuration within the Oracle Application R12 system.Rapid install generates/create number of different environment files.
<CONTEXT_NAME>.env => $ORACLE_HOME (10.2.0.2) => Oracle Server Ent. Edition
<CONTEXT_NAME>.env => $ORACLE_HOME (AS 10.1.2)=> Oracle Tools Tech Stack
<CONTEXT_NAME>.env=> $ORACLE_HOME (AS 10.1.3)=> Java Tech Stack
<CONTEXT_NAME>.env => $APPL_TOP => Oracle Applications
APPS<CONTEXT_NAME>.env => $APPL_TOP =>Consolidated Environment file
Here CONTEXT_NAME is referred to_.CONTEXT_NAME.env is called environment setup file. Whereas APPS<CONTEXT_NAME>.env.env is called a consolidated environment file which reside under APPL_TOP directory.
Now question must be arise in your mind what is in CONTEXT_NAME.env environment file.
As pre R12 DBA must be aware of and fresher might be thinking what it consist of.
So here comes the answer....
CONTEXT_NAME.env consist of :
Product Directories and Subdirectories
Product Directories Paths
Other environment information
Oracle application have important and core environment file is <CONTEXT_NAME>.env
Also you should know what parameters are part of <CONTEXT_NAME>.env environment file.
Here you go to know the description of these parameters.
APPLFENV - This parameter refers to name of the <CONTEXT_NAME>.env environment file.
APPL_TOP - This parameter refers to top-level directory for this installation of Oracle applications.
INST_TOP - This parameter refers to top-level directory for this instance.
FND_TOP - This parameter refers to path to AOL directory. For e.g /d01/oracle/apps/apps_st/appl/fnd/12.0.0
AU_TOP - This parameter refers to path to the applications utilities directory. For e.g /d01/oracle/apps/apps_st/appl/au/12.0.0.
NLS_LANG - This parameter refers to territory,language and character set installed in the database. For e.g AMERICAN_AMERICA.UTF8
NLS_DATE_FORMAT - This parameter refers to National language support date format.For e.g The default is "DD-MON-RR", e.g 16-JUL-08.
NLS_NUMERIC_CHARACTERS - This parameter refers to National language support numberic separators. The defulat is period and comman (".,").
<PROD>_TOP - This parameter refers to path to a product's top directory
GWYUID - This parameter refers to the user name/password that give access to the initial sign on.
APPLDCP - This parameter refers to whether PCP is being used. This should be set to OFF if not using PCP.
APPLTMP - This parameter refers to directory for temp file in Oracle Applications.
APPLPTMP - This parameter refers to directory for temp PL/SQL output files.
APPLCNAM - This parameter refers to 8.3 file name convention for concurrent manager log and output files format.
APPLLOG - This parameter refers to concurrent manager log subdirectory.
APPLOUT - This parameter refers to concurrent manager output files subdirectory.
APPLCSF - This parameter refers to the top-level directory for concurrent manager log and output files if they are consolidated into single direcotry for all products.
PATH - This parameter refers to sets directory search path
FNDNAM - This parameter refers to the name of the schema to which the system
administration responsibility connects.
ADMIN_SCRIPTS_HOME - This parameter refers to directory under $INST_TOP that identifies the location of control scripts.
PLATFORM - This parameter refers to the O/S currently in use. The value of this parameter should match with $APPL_TOP/admin/adpltfrom.txt
I will continue with other environment files in my next post..coming soon...
Environment Files and Control scripts:
Environment files are in place to manage the setup and configuration within the Oracle Application R12 system.Rapid install generates/create number of different environment files.
Here CONTEXT_NAME is referred to
Now question must be arise in your mind what is in CONTEXT_NAME.env environment file.
As pre R12 DBA must be aware of and fresher might be thinking what it consist of.
So here comes the answer....
CONTEXT_NAME.env consist of :
Oracle application have important and core environment file is <CONTEXT_NAME>.env
Also you should know what parameters are part of <CONTEXT_NAME>.env environment file.
Here you go to know the description of these parameters.
administration responsibility connects.
I will continue with other environment files in my next post..coming soon...
Tuesday, February 5, 2008
Steps involved in Cloned Target System in R12 EBS Enviornment
1. Prepare the Source system database and application Tier for cloning.
2. Copy the Source System to Target System
3. Configure the Target System
4. Post Clone Tasks.
2. Copy the Source System to Target System
3. Configure the Target System
4. Post Clone Tasks.
Steps involved in Adding a Node using Advance Cloning Options in R12 EBS
In this post I am going discuss steps involved in Adding a Node using Advance Cloning Options in R12 EBS
1. Rapid Clone can be used to setup a new node being added to an existing application system.
2. On your new node can either run the Same services as the source node or different services.
3. Prepare the Source system, copy it to the new node and configure it as applicable.
4. Once the adcfgclone.pl completes, set up the environment and run adaddnode.pl on the target system.
cd $COMMON_TOP/clone/bin
perl adaddnode.pl
Steps Involved in Cloning for Mulit-Node Systems in R12 EBS Enviornment
I am going discuss in this post Steps involved in Cloning Mulit-Node Systems in R12 EBS environemnt. Rapid clone also used for Mulit-Node System cloning like Single-Node System.
In R12 Release,only one copy of the files for the application tier nodes needs to be copied to the target system as new feature of unified APPL_TOP introduced. In which all files required for all application tier services are included with every applications node, with multiple nodes being differentitated by the services started on each.You can clone using shared file system too.You can specify the services to start for each target node while entering response to the prompts during configuration steps.
To add non-shared applications nodes,carry out the copy and configure steps in the same way as on Primary Node.
Clone a Single-Node System to Mulit-Node System
This method of cloning allows the original node system to be cloned into a multi-node system.
Pre-Steps on the source and all target nodes.
a. Verify source and target node software versions
b. Apply the latest Rapid Clone patch (if required or applicable)
c. Set up Rapid Clone on the Apps Tier.
d. Set up Rapid Clone on the DB Tier.
Steps involved in Cloning procedure
a. Prepare the source system
b. Copy the Source system to the Target System
c. Configure the Target System
d. Post clone Steps like Profile update,utl_file_dir,Printer update, Workflow mailer etc.
Cloning a Mulit-Node System to a Mulit-Node System
1. A multi-node system can be cloned if the number of nodes and distribution of servers inthe target system matches that of the source system.
2. To clone a multi-node system to multi-node system perform the cloning process on each node.
Special Note: Always cloned database instance first.
In R12 Release,only one copy of the files for the application tier nodes needs to be copied to the target system as new feature of unified APPL_TOP introduced. In which all files required for all application tier services are included with every applications node, with multiple nodes being differentitated by the services started on each.You can clone using shared file system too.You can specify the services to start for each target node while entering response to the prompts during configuration steps.
To add non-shared applications nodes,carry out the copy and configure steps in the same way as on Primary Node.
This method of cloning allows the original node system to be cloned into a multi-node system.
Pre-Steps on the source and all target nodes.
a. Verify source and target node software versions
b. Apply the latest Rapid Clone patch (if required or applicable)
c. Set up Rapid Clone on the Apps Tier.
d. Set up Rapid Clone on the DB Tier.
Steps involved in Cloning procedure
a. Prepare the source system
b. Copy the Source system to the Target System
c. Configure the Target System
d. Post clone Steps like Profile update,utl_file_dir,Printer update, Workflow mailer etc.
1. A multi-node system can be cloned if the number of nodes and distribution of servers inthe target system matches that of the source system.
2. To clone a multi-node system to multi-node system perform the cloning process on each node.
Special Note: Always cloned database instance first.
Steps involved in Refreshing a Target System in R12 EBS Environment
In this post I am going to discuss about Refresh a Target System in R12 E-Business Suite environment.
The system to be clone is called as "Source System" and newly created(or cloned) system is called as "Target System".
Step 1: Ref in my previous post "Steps Involved in Cloning R12 e-Business Suites Environment (Single Node)" to prepare the source system.
Step 2: Copy any parts of the application tier file system that have been updated on the source system. It may require to refresh the target system's APPL_TOP,COMMON_TOP,or Tech Stack.
Step 3: You need to Refresh your database node at the same time. For database node refresh, Copy the database node file system ($ORACLE_HOME - RDBMS HOME).
Step 4: To configure the Target System to be Refreshed by specifying the exisiting Target System when running adcfgclone.pl.
perl adcfgclone.pl dbTier <CONTEXT FILE ON TARGET SYSTEM ON DATABASE NODE>
perl adcfgclone.pl appsTier <$INST_TOP/appl/admin/<CONTEXT FILE ON TARGET SYSTEM ON APPS TIER>>
Step 5: Once Refresh is finished. If you have customized environment then change post clone profile options, utl_file_dir etc.
Test your Refreshed environment and enter the below URL in your browser
http://r12b.quickoracle.com:8000
or
http://<hostname>.<domain_name>:<HTTP port>
Thursday, January 31, 2008
Steps Involved in Cloning R12 e-Business Suites Environment (Single Node)
Cloning is the process of creating an identical copy of an existing Oracle Application System. The new and existing systems must have component versions and platform type identical for cloning.
I am going to discuss the steps involved to Clone a Single Node system in R12 EBS.
Source Instance Name : r12a.quickoracle.com
Target Instance Name : r12b.quickoracle.com
Preparation to clone the Oracle Application System (Source).
1) sudo su - appl<sid> user.
2) execute the Consolidated Applications enviornment file.
$cd $APPL_TOP
$.APPS<context_name>.env
3) zip utility should be in your PATH.
$ PATH=$PATH:<Location of zip utlity installed on your system>
$ export PATH
4) Stop all Apps Tier Server processes.
$ cd $INST_TOP/admin/scripts
$ adstpall.sh APPS/<passwd of APPS user>
5) Verify latest Rapid Clone patches on metalink and apply if required.(Not applicable)
6) On Apps Tier run AutoConfig and after that on Database Tier.
Apps Tier:
$ cd $INST_TOP/admin/scripts
$ adautocfg.sh
DB Tier:
RDBMS HOME = $ORACLE_HOME
$ cd $ORACLE_HOME/appsutil/scripts/<context_name>
$ adautocfg.sh
Pre-Clone Steps Starts from Here
1. DB Tier preparation for Cloning :
On Source System:
a) login in as Oracle user : $ sudo su - oracle
b) Run the following commands:
RDBMS HOME = $ORACLE_HOME
$ cd $ORACLE_HOME/appsutil/scripts/<context_name>
$ perl adpreclone.pl dbTier
2. Verify the errors and warnings in the log.
RDBMS_HOME = $ORACLE_HOME
Location of the log file StageDBTier_
I am going to discuss the steps involved to Clone a Single Node system in R12 EBS.
Source Instance Name : r12a.quickoracle.com
Target Instance Name : r12b.quickoracle.com
Preparation to clone the Oracle Application System (Source).
1) sudo su - appl<sid> user.
2) execute the Consolidated Applications enviornment file.
$cd $APPL_TOP
$.APPS<context_name>.env
3) zip utility should be in your PATH.
$ PATH=$PATH:<Location of zip utlity installed on your system>
$ export PATH
4) Stop all Apps Tier Server processes.
$ cd $INST_TOP/admin/scripts
$ adstpall.sh APPS/<passwd of APPS user>
5) Verify latest Rapid Clone patches on metalink and apply if required.(Not applicable)
6) On Apps Tier run AutoConfig and after that on Database Tier.
Apps Tier:
$ cd $INST_TOP/admin/scripts
$ adautocfg.sh
DB Tier:
RDBMS HOME = $ORACLE_HOME
$ cd $ORACLE_HOME/appsutil/scripts/<context_name>
$ adautocfg.sh
1. DB Tier preparation for Cloning :
On Source System:
a) login in as Oracle user : $ sudo su - oracle
b) Run the following commands:
RDBMS HOME = $ORACLE_HOME
$ cd $ORACLE_HOME/appsutil/scripts/<context_name>
$ perl adpreclone.pl dbTier
2. Verify the errors and warnings in the log.
RDBMS_HOME = $ORACLE_HOME
Location of the log file StageDBTier_
Sunday, January 27, 2008
Where is Administration Server Component in R12 EBS
Pre-11i & 11i DBA's now say goodbye to Administration Server component.Administration Server in R12 is now a history or the right way to say "Obsolete".
There no such component in R12 Architecture and by default any application tier node used to perform the below operations.
Apply DB patches to Apps: In Oracle application most of the time you will observe in most of the patches consists of files and scripts that update the file system and DB objects. To apply these patch (i.e, which includes cumulative and minipacks and maintenance packs patches). You use adpatch utility (also called AutoPatch utility) to perform any updates.
Maintain Apps:AD Administration Utility (adadmin) require maintenance to optimize system performance and enables you to perform other file system and database maintenance tasks.
There no such component in R12 Architecture and by default any application tier node used to perform the below operations.
Saturday, January 26, 2008
R12 Java Servlet Access using HTML Applications
In this post I am going discuss access path use by HTML interface module when using a JSP.
a)User access a function on a browser (HTML hyperlink access)
b)then the browser generate a URL request to the web server.
c)Web listener talk to servlet engine (Jserv)then runs a JSP.
d)JSP then contact Application tables to obtain contents and use metadata dictionary information to build a HTML page.
e)The HTMP page which is build in previous step sent back to the browser with the help of web server.
R12 Oracle Application Framework
In this post I am going to discuss about R12 Oracle Applicaiton Framework Components and it processing.
Oracle Application Framework is the development platform for HTML-based applications. It consist of a java-based application tier framework and associated services. It designed to facilitate the rapid deployment of HTML-based applications.
Oracle Application Framework uses below components:
AOL JAVA or AOL/J
It provides the OAF with underlying security and applicaiton Java Services.Also OAF with its connection to the DB and with application-specific functionality for e.g attachments and flexfields.
BC4J
JDeveloper incluedes BC4J. Java Business components are created by BC4J for representing business logic. It seperates the business logic from UI by mapping the relational tables to java objects.
Java Controller
It processes the programmatic UI definition.
Metadata UI Definition
Apache Jserv module provides the Java servlet engine uses metadata dictionary to to construct the Framework UI.
HTML Generator UIX
UIX , the HTML Generator
HTML-based applicaiton uses the following path with OAF on application Tiers. The steps are discussed below.
a)User click a function on browser (HTML hyperlink access).
b)URL request to the web listener sent by browser.
c)User access validated by AOL/J.
d)Page definition is loaded from the metadata dicitionary on the DB tier into the application Tier (i,e. Metadata UI definition)
e)BC4J objects that contain the application logic and access the database are instantiated.
f)Java controller programatically manipulates the page definition as necessary, based on dynamic UI rules.
g)HTML UI Generatior (UIX)interprets the page definition. It creates the related HTML based on UI standards, and send the page to the browser.
Oracle Application Framework is the development platform for HTML-based applications. It consist of a java-based application tier framework and associated services. It designed to facilitate the rapid deployment of HTML-based applications.
Oracle Application Framework uses below components:
It provides the OAF with underlying security and applicaiton Java Services.Also OAF with its connection to the DB and with application-specific functionality for e.g attachments and flexfields.
JDeveloper incluedes BC4J. Java Business components are created by BC4J for representing business logic. It seperates the business logic from UI by mapping the relational tables to java objects.
It processes the programmatic UI definition.
Apache Jserv module provides the Java servlet engine uses metadata dictionary to to construct the Framework UI.
UIX , the HTML Generator
HTML-based applicaiton uses the following path with OAF on application Tiers. The steps are discussed below.
a)User click a function on browser (HTML hyperlink access).
b)URL request to the web listener sent by browser.
c)User access validated by AOL/J.
d)Page definition is loaded from the metadata dicitionary on the DB tier into the application Tier (i,e. Metadata UI definition)
e)BC4J objects that contain the application logic and access the database are instantiated.
f)Java controller programatically manipulates the page definition as necessary, based on dynamic UI rules.
g)HTML UI Generatior (UIX)interprets the page definition. It creates the related HTML based on UI standards, and send the page to the browser.
Sunday, January 13, 2008
Step By Step Installation of VMWARE on WinXP Professional - Part I
In this post I am going to discuss about Step by Step Installation of DB11gR1 Clusterware on OL4 Update 5 using VMWare (Virtual Servers) on WinXP. I tested this configuration on my laptop.
Objective: This installation procedure for learning and testing purpose. This kind of configuration is not suitable for any Production and Test Environment.
Hardware Requirements
Lenovo Thinkpad Laptop
Windows XP Professional 5.1.2600,Service Pack 2 (Host O/S)
Intel(R) Core(TM)2 Duo CPU
T7300 @2.00 GHZ
200 GB HDD (Actual Installation required by one node is 35 GB + 10 GB to Stage Software required by you and for future use)
2 GB RAM
Note: As far as my experience with this installation you should have minimum 3GB RAM. I faced few issues like one node goes down and if you are running any memory intensive program. Better to have minimum 3 GB RAM. I used 800 MB for each node and rest for host operating system.
Oracle Enterprise Linux 4 (Update 5) (Guest O/S)
VMWare Server 1.0.4
Software Requirements
Follow the sequence to Install RAC11g+ASM on clusterware using OL4 update 5(On VMWare).
Step By Step Installation of VMWARE on WinXP Professional - Part I - Start Here
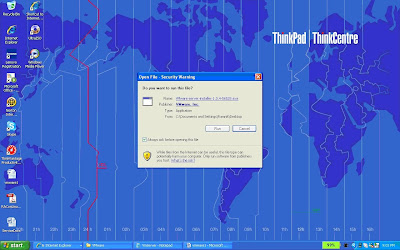
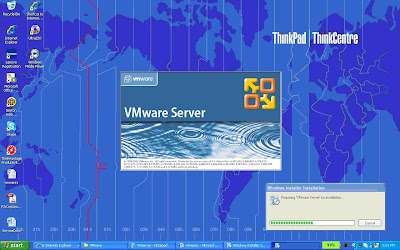
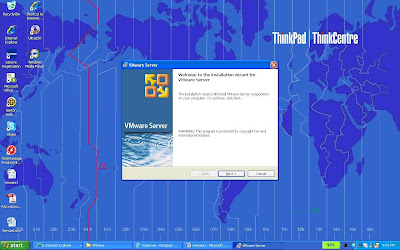
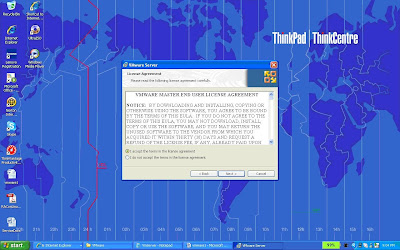
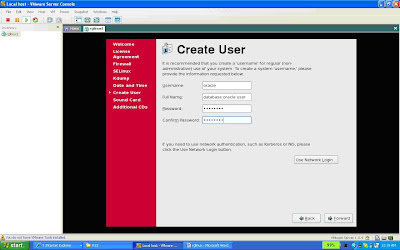
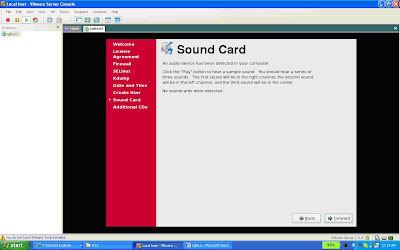
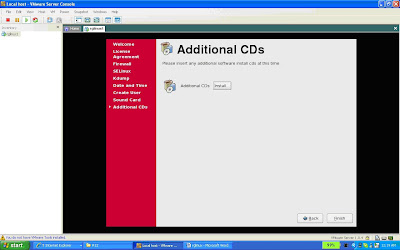
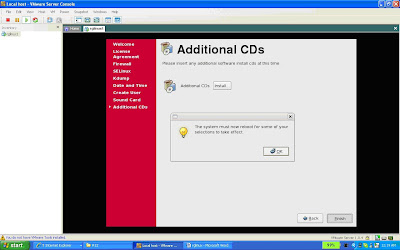
Start the installation by double clicking the VWWare software you downloaded from VMWare Site. There is free Trial product key is allocated for you to use this product. Screen Shots are Self Explantory to Install VMWare. Please Follow the snapshots. If you are not able to read the text inside the snapshot please click on snapshot and it will take you to picasa web album and you can see slide show to view more clearly.
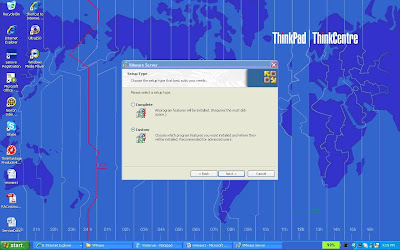

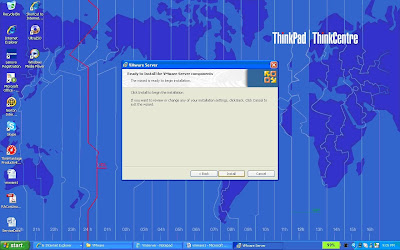
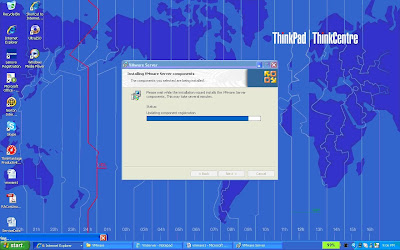

Step By Step Installation of VMWARE on WinXP Professional - Part I - End Here
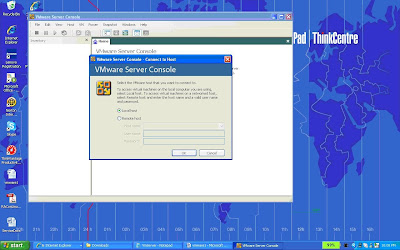
VMWare Virtual Machine Configuration- Start Here
Configure the First Virtual Host - rglinux1
Follow the self explantory snapshots to install your first Virtual host "rglinux1". You can give any name to your vitual machine
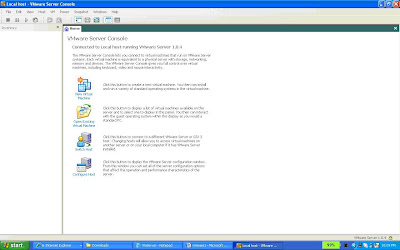
To Start "VMWare Server Console" click on your VMWare shortcut on your desktop - Select the default option "Local Host"
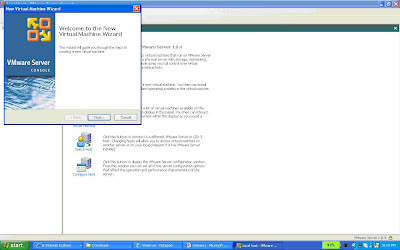
To Configure Virtual Machine Select "New Virtual Machine" under Virtual Machine Options
The "New Virtual Machine Wizard" will start, Click Next
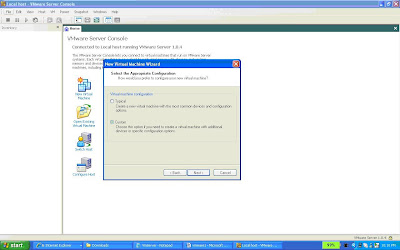
Select "Custom" under Virtual Machine Configuration
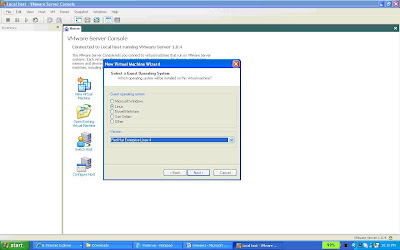
Select "Linux" under Guest Operating System and change the version to "RedHat Enterprise Linux 4"
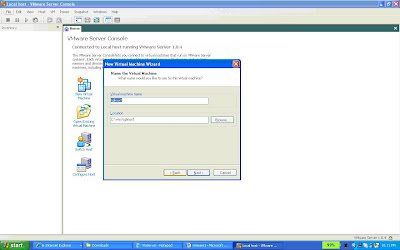
Name the Virtual Machine "rglinux1" under Virtual Machine Name. Enter the Location "C:\vms\rglinux1" (Single Node Configuration). To Configure Linux Cluster (Multi-Node Configuration) for RAC configuration. You can change the path as "C:\vms\RAC\ASM11g\rac1" and Machine Name for RAC Setup is ASM_11gRAC1
Set Access Rights - Uncheck this option. The default is shown in snapshot

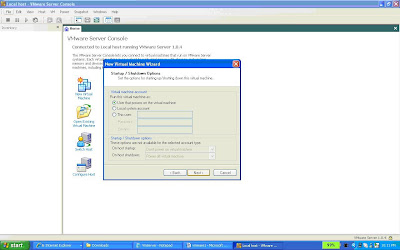
startup/Shutdown Options - Select Default "User that powers on the virtual machine"
Select "Number of Processor" depending on your machine - Default is one - I select as Two as per my machine configuration

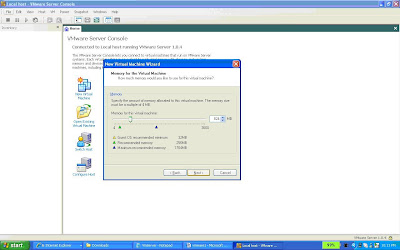
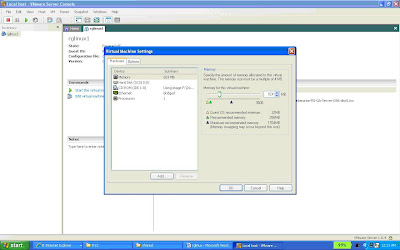
Memory for Virtual Machine - I configured initially with 824 MB. The best for RAC11g configuration is 3GB and you can allocate 1024 Machine for each Virtual Machine and rest for Host Operating system (WinXP
Select Network Type as "Use Bridged Networking"

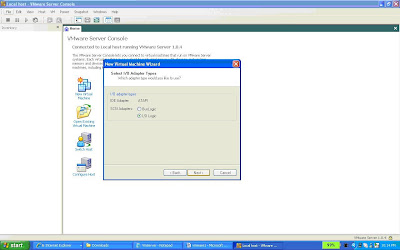
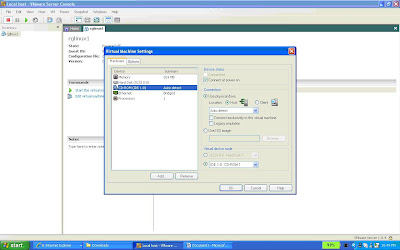
Select I/O Adapter Types as "LSI Logic"
Select a Disk as "Create a new Virtual Disk"
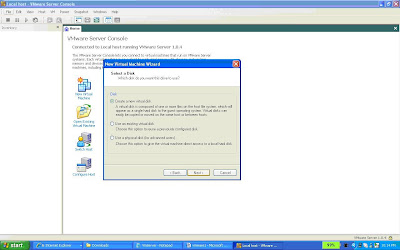
Select a Disk Type as "SCSI"

Specify Disk Capacity - Select the second option as split disk into 2GB disks. Uncheck the first option shown in snapshot - I just Enter 35GB to configure other products of oracle on same box. Ref 11g RAC docs for Disk Space Requirement
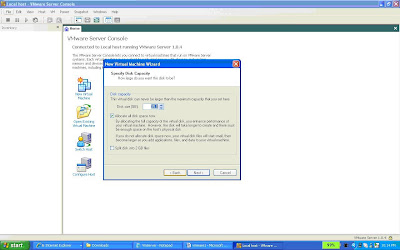
Enter virtual disk filename (rglinux1.vmdk in snapshot). I changed for my RAC configuration to localdisk.vmdk.

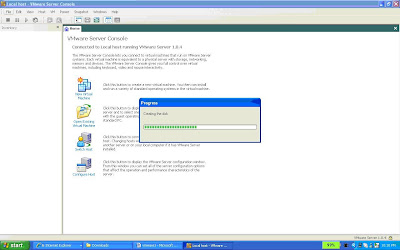
Creating a Disk - This is for Single Node Installation not for RAC Configuration on Linux Clusters. This step can be skipped if you are configuring Linux Cluster for RAC11g.
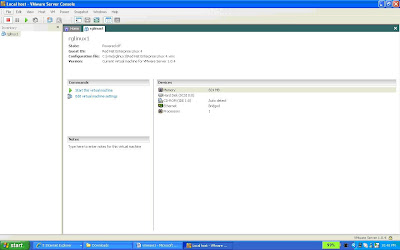
View of First Virtual Machine name "rglinux1" or You can give name as ASM_11gRAC1 for linux cluster for RAC11g Configuration.
VMWare Virtual Machine Configuration- End Here
To Install Linux on Your First Virtual Machine. Please follow the post "Step by Step Installation of Oracle Enterprise 4 Update 5 using VMWare on WinXP Professional - Part 2"
Objective: This installation procedure for learning and testing purpose. This kind of configuration is not suitable for any Production and Test Environment.
Hardware Requirements
Lenovo Thinkpad Laptop
Windows XP Professional 5.1.2600,Service Pack 2 (Host O/S)
Intel(R) Core(TM)2 Duo CPU
T7300 @2.00 GHZ
200 GB HDD (Actual Installation required by one node is 35 GB + 10 GB to Stage Software required by you and for future use)
2 GB RAM
Note: As far as my experience with this installation you should have minimum 3GB RAM. I faced few issues like one node goes down and if you are running any memory intensive program. Better to have minimum 3 GB RAM. I used 800 MB for each node and rest for host operating system.
Oracle Enterprise Linux 4 (Update 5) (Guest O/S)
VMWare Server 1.0.4
Software Requirements
- Oracle 11g (11.1.0.6) Database & Clusterware Software
- Oracle Enterprise Linux 4 (Update 5)
- VMware Server 1.0.4
General
Follow the sequence to Install RAC11g+ASM on clusterware using OL4 update 5(On VMWare).
- Step By Step Installation of VMWARE on WinXP Professional - Part I
- Step by Step Installation of Oracle Enterprise 4 Update 5 using VMWare on WinXP Professional - Part 2
- Step by Step Installation of Oracle Enterprise 4 Update 5 using VMWare on WinXP Professional - Part 3
- Step by Step Installation of Clusterware11gR1 on Oracle Linux 4 Update 5 using VMWare on WinXP - Part 4
- Step By Step Installation of ASM and Oracle DB11gR1 on Oracle Enterprise Linux 4 Update 5 using VMWare on WinXP - Part5
Step By Step Installation of VMWARE on WinXP Professional - Part I - Start Here
Start the installation by double clicking the VWWare software you downloaded from VMWare Site. There is free Trial product key is allocated for you to use this product. Screen Shots are Self Explantory to Install VMWare. Please Follow the snapshots. If you are not able to read the text inside the snapshot please click on snapshot and it will take you to picasa web album and you can see slide show to view more clearly.


Step By Step Installation of VMWARE on WinXP Professional - Part I - End Here
VMWare Virtual Machine Configuration- Start Here
Configure the First Virtual Host - rglinux1
Follow the self explantory snapshots to install your first Virtual host "rglinux1". You can give any name to your vitual machine
To Start "VMWare Server Console" click on your VMWare shortcut on your desktop - Select the default option "Local Host"

To Configure Virtual Machine Select "New Virtual Machine" under Virtual Machine Options

The "New Virtual Machine Wizard" will start, Click Next

Select "Custom" under Virtual Machine Configuration

Select "Linux" under Guest Operating System and change the version to "RedHat Enterprise Linux 4"

Name the Virtual Machine "rglinux1" under Virtual Machine Name. Enter the Location "C:\vms\rglinux1" (Single Node Configuration). To Configure Linux Cluster (Multi-Node Configuration) for RAC configuration. You can change the path as "C:\vms\RAC\ASM11g\rac1" and Machine Name for RAC Setup is ASM_11gRAC1

Set Access Rights - Uncheck this option. The default is shown in snapshot

startup/Shutdown Options - Select Default "User that powers on the virtual machine"

Select "Number of Processor" depending on your machine - Default is one - I select as Two as per my machine configuration

Memory for Virtual Machine - I configured initially with 824 MB. The best for RAC11g configuration is 3GB and you can allocate 1024 Machine for each Virtual Machine and rest for Host Operating system (WinXP

Select Network Type as "Use Bridged Networking"

Select I/O Adapter Types as "LSI Logic"

Select a Disk as "Create a new Virtual Disk"

Select a Disk Type as "SCSI"

Specify Disk Capacity - Select the second option as split disk into 2GB disks. Uncheck the first option shown in snapshot - I just Enter 35GB to configure other products of oracle on same box. Ref 11g RAC docs for Disk Space Requirement

Enter virtual disk filename (rglinux1.vmdk in snapshot). I changed for my RAC configuration to localdisk.vmdk.

Creating a Disk - This is for Single Node Installation not for RAC Configuration on Linux Clusters. This step can be skipped if you are configuring Linux Cluster for RAC11g.

View of First Virtual Machine name "rglinux1" or You can give name as ASM_11gRAC1 for linux cluster for RAC11g Configuration.

VMWare Virtual Machine Configuration- End Here
To Install Linux on Your First Virtual Machine. Please follow the post "Step by Step Installation of Oracle Enterprise 4 Update 5 using VMWare on WinXP Professional - Part 2"
Step by Step Installation of Oracle Enterprise 4 Update 5 using VMWare on WinXP Professional - Part 2
In my previous post we Configure the First Virtual Machine as rglinux1 or ASM_11gRAC1.In this post I am going to discuss further configuration of First Virtual Machine and then we will Install Linux on First Virtual Machine.
For RAC11g Configuration First we need to Add the Shared Disks and an additional Network Card (to handle private network for interconnect). Select "Edit Virtual Machine from VMWare Server Console". A new pop-up windows of Virtual Machine Settings will come. Select Add to "Add New Hardware". Select "Ethernet Adpater" to configure private Interconnect (2nd NIC or Ethernet Card). Select "Next" to go for next screen of "Network Type" and Select option as "Host-Only:A private network shared with the host". Please verify that "connect at power on" should be selected.
Again start the "New Hardware Wizard" to configure Disk for RAC11g Configuration.
You need to configure based on below information provided for database file,OCR and Voting disk.
Disk Table
Database files => 3Gb => SCSI 1:0 =>datadisk1.vmdk
Database files => 3Gb => SCSI 1:1 =>datadisk2.vmdk
Database files => 3Gb => SCSI 1:2 =>datadisk3.vmdk
OCR => 300Mb =>SCSI 1:3=>ocrdisk.vmdk
Voting Disk => 300Mb => SCSI 1:4=>votingdisk.vmdk
Select "Hard Disk" to add a new Hard Disk. Click on "Next" to go to next screen to select a Disk. Select "Create a new Virtual Disk" then Select Disk Type as "SCSI". Click on "Next" to go to next screen to allocate Disk Space mentioned above for Database files. Please select "Allocate all disk space now" option to configure these disks. On next screen Specify data file please give name of this disk as "datadisk1.vmdk" and browse the path to share directory under "C:\vms\RAC\ASM11g\share" to save this file. Once the Disk is create then select the same harddisk and click on Advanced configuration to change the virtual device node as mentioned above in "Disk Table". Change Virtual Device node from existing value to SCSI 1:0. and select "Indepedent" and "persistent" disk option. You can repeat this step for all other disk to configure disk for RAC11g configuration.
When all disk are configured. Close the "Virtual Machine Settings" to confirm the changes to Virtual Machine configuration file.Now edit the virtual machine confiuration file (i.e, Red Hat Enterprise Linux 4) and the parameters where # sign is shown. Remove this # sign to use these parameters as part of you configuration file.
Configuration File - Start Here
config.version = "8"
virtualHW.version = "4"
numvcpus = "2"
scsi0.present = "TRUE"
scsi0.virtualDev = "lsilogic"
memsize = "900"
scsi0:0.present = "TRUE"
scsi0:0.fileName = "localdisk.vmdk"
ide1:0.present = "TRUE"
ide1:0.fileName = "D:"
ide1:0.deviceType = "cdrom-raw"
floppy0.present = "FALSE"
Ethernet0.present = "TRUE"
displayName = "ASM_11gRAC1"
guestOS = "rhel4"
priority.grabbed = "normal"
priority.ungrabbed = "normal"
#disk.locking = "FALSE"
#diskLib.dataCacheMaxSize = "0"
#diskLib.dataCacheMaxReadAheadSize = "0"
#diskLib.dataCacheMinReadAheadSize = "0"
#diskLib.dataCachePageSize = "0"
#scsi1.sharedBus = "virtual"
scsi1.present = "TRUE"
scsi1:0.present = "TRUE"
scsi1:0.fileName = "C:\vms\ASM11g\share\datadisk1.vmdk"
scsi1:0.mode = "independent-persistent"
#scsi1:0.deviceType = "disk"
scsi1:1.present = "TRUE"
scsi1:1.fileName = "C:\vms\RAC\ASM11g\share\datadisk2.vmdk"
scsi1:1.mode = "independent-persistent"
#scsi1:1.deviceType = "disk"
scsi1:2.present = "TRUE"
scsi1:2.fileName = "C:\vms\RAC\ASM11g\share\datadisk3.vmdk"
scsi1:2.mode = "independent-persistent"
#scsi1:2.deviceType = "disk"
scsi1:3.present = "TRUE"
scsi1:3.fileName = "C:\vms\RAC\ASM11g\share\ocrdisk.vmdk"
scsi1:3.mode = "independent-persistent"
#scsi1:3.deviceType = "disk"
scsi1:4.present = "TRUE"
scsi1:4.fileName = "C:\vms\RAC\ASM11g\share\votingdisk.vmdk"
scsi1:4.mode = "independent-persistent"
#scsi1:4.deviceType = "disk"
scsi1.virtualDev = "lsilogic"
ide1:0.autodetect = "FALSE"
Ethernet1.present = "TRUE"
Ethernet1.connectionType = "hostonly"
scsi0:0.redo = ""
scsi1:0.redo = ""
scsi1:1.redo = ""
scsi1:2.redo = ""
scsi1:3.redo = ""
scsi1:4.redo = ""
ethernet0.addressType = "generated"
ethernet1.addressType = "generated"
uuid.location = "56 4d f6 04 91 f9 39 2c-b9 3f 19 f1 c4 af 8a 39"
uuid.bios = "56 4d f6 04 91 f9 39 2c-b9 3f 19 f1 c4 af 8a 39"
ethernet0.generatedAddress = "00:0c:29:af:8a:39"
ethernet0.generatedAddressOffset = "0"
ethernet1.generatedAddress = "00:0c:29:af:8a:43"
ethernet1.generatedAddressOffset = "10"
ide1:0.startConnected = "TRUE"
tools.syncTime = "TRUE"
workingDir = "."
Configuration File - End Here
Linux Installation - Start Here
"Edit The Virtual Machine Setting" under VMWare Server Controls
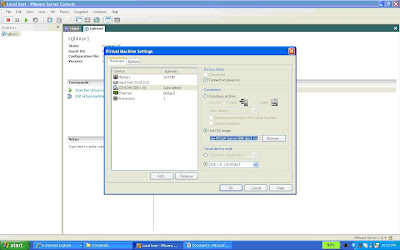
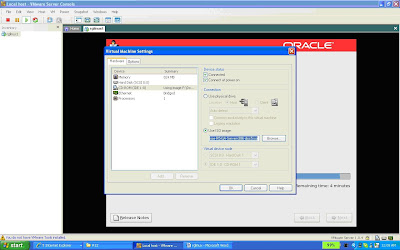
Select The "CD-ROM" under Hardware Tab
Change the Connection on right Pane of CD-ROM from Use Physical Drive to Use ISO Image. You can place you Linux ISO Image on your Hard Drive Or copy the ISO Image on CD-ROM. I Staged the Oracle Enterprise Linux on my Hard Drive C:\Software.
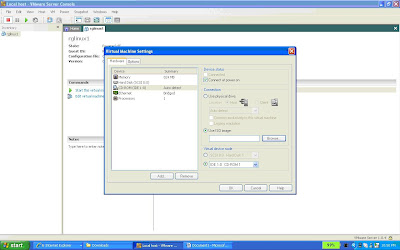
Select the Second option "Use ISO Image" under Connection.
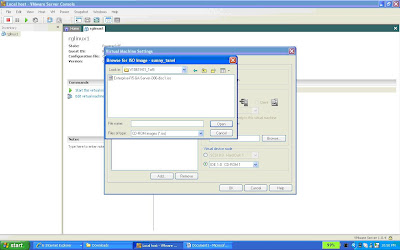
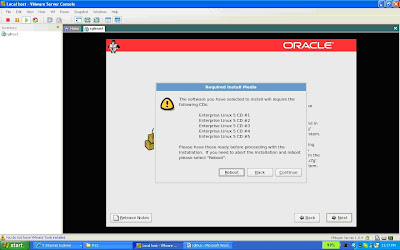
Browse the First ISO Image of Oracle Enterprise Linux (disc1) under "Use ISO Image" and Click on "OK"
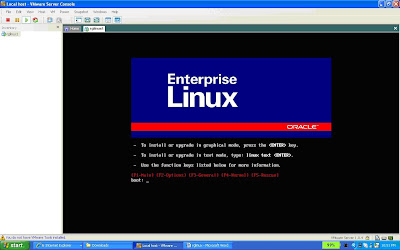
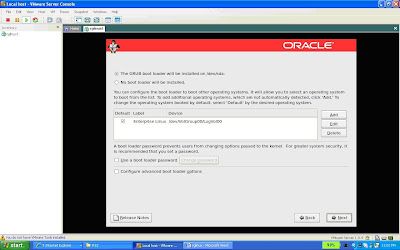
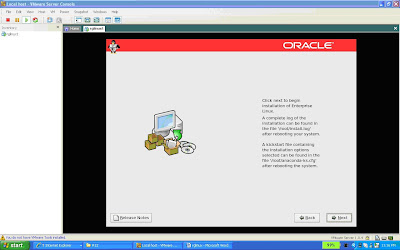
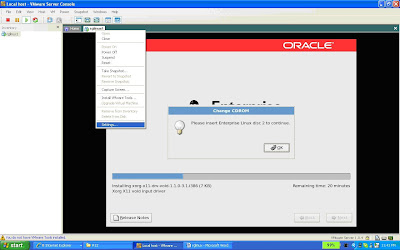
Click on "Start this Virtual Machine and You will see Linux boot: Prompt. Press Enter to Continue with Linux Installation.
Linux Driver Installation Screen
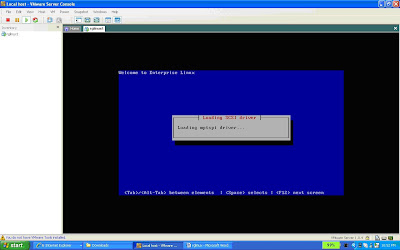
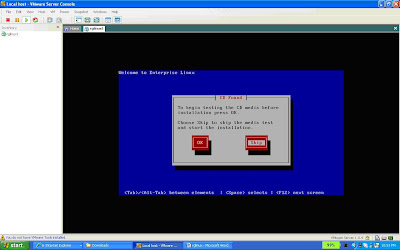
Linux O/S is test CD on this step. Press Tab to Skip this test
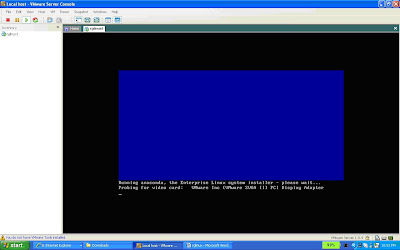
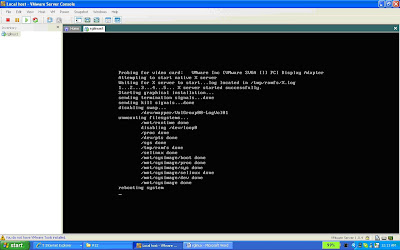
Probing for Video Card
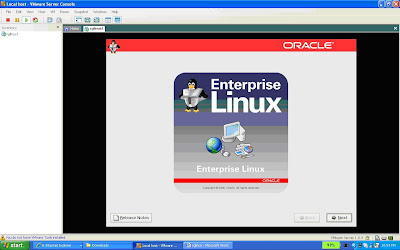
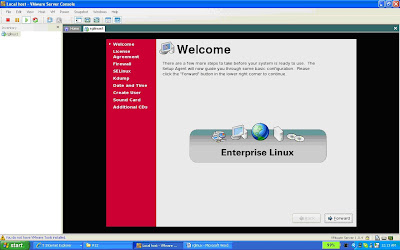
Click Next to Continue with Linux Installation
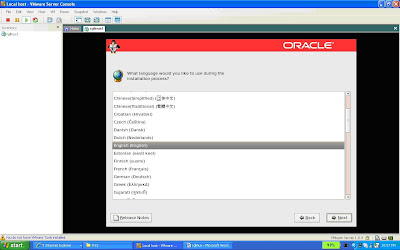
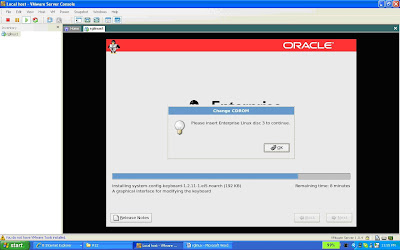
Linux O/S Language Selection - By Default "English(English)"
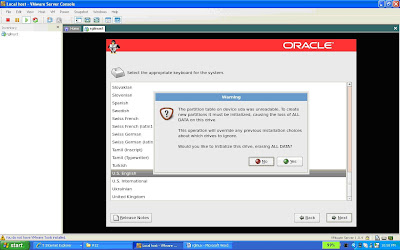
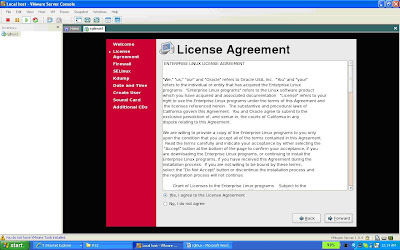
Select appropriate Keyboard for the System (U.S English). Click "Next" and a Warning Message will display. Press "Yes" to Continue.

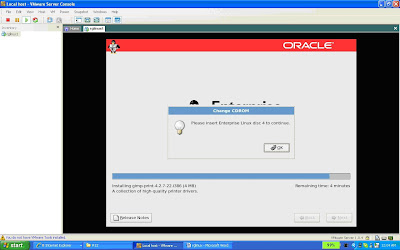
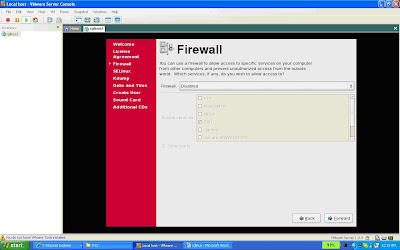
Keep Default selection on this page and Select "Next" to Continue with Linux Installation.


For RAC11g Configuration First we need to Add the Shared Disks and an additional Network Card (to handle private network for interconnect). Select "Edit Virtual Machine from VMWare Server Console". A new pop-up windows of Virtual Machine Settings will come. Select Add to "Add New Hardware". Select "Ethernet Adpater" to configure private Interconnect (2nd NIC or Ethernet Card). Select "Next" to go for next screen of "Network Type" and Select option as "Host-Only:A private network shared with the host". Please verify that "connect at power on" should be selected.
Again start the "New Hardware Wizard" to configure Disk for RAC11g Configuration.
You need to configure based on below information provided for database file,OCR and Voting disk.
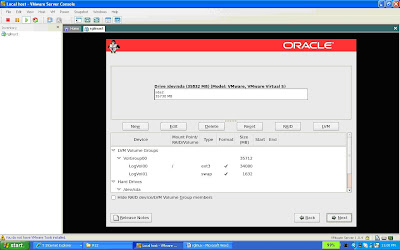
Disk Table
Select "Hard Disk" to add a new Hard Disk. Click on "Next" to go to next screen to select a Disk. Select "Create a new Virtual Disk" then Select Disk Type as "SCSI". Click on "Next" to go to next screen to allocate Disk Space mentioned above for Database files. Please select "Allocate all disk space now" option to configure these disks. On next screen Specify data file please give name of this disk as "datadisk1.vmdk" and browse the path to share directory under "C:\vms\RAC\ASM11g\share" to save this file. Once the Disk is create then select the same harddisk and click on Advanced configuration to change the virtual device node as mentioned above in "Disk Table". Change Virtual Device node from existing value to SCSI 1:0. and select "Indepedent" and "persistent" disk option. You can repeat this step for all other disk to configure disk for RAC11g configuration.
When all disk are configured. Close the "Virtual Machine Settings" to confirm the changes to Virtual Machine configuration file.Now edit the virtual machine confiuration file (i.e, Red Hat Enterprise Linux 4) and the parameters where # sign is shown. Remove this # sign to use these parameters as part of you configuration file.
Configuration File - Start Here
config.version = "8"
virtualHW.version = "4"
numvcpus = "2"
scsi0.present = "TRUE"
scsi0.virtualDev = "lsilogic"
memsize = "900"
scsi0:0.present = "TRUE"
scsi0:0.fileName = "localdisk.vmdk"
ide1:0.present = "TRUE"
ide1:0.fileName = "D:"
ide1:0.deviceType = "cdrom-raw"
floppy0.present = "FALSE"
Ethernet0.present = "TRUE"
displayName = "ASM_11gRAC1"
guestOS = "rhel4"
priority.grabbed = "normal"
priority.ungrabbed = "normal"
#disk.locking = "FALSE"
#diskLib.dataCacheMaxSize = "0"
#diskLib.dataCacheMaxReadAheadSize = "0"
#diskLib.dataCacheMinReadAheadSize = "0"
#diskLib.dataCachePageSize = "0"
#scsi1.sharedBus = "virtual"
scsi1.present = "TRUE"
scsi1:0.present = "TRUE"
scsi1:0.fileName = "C:\vms\ASM11g\share\datadisk1.vmdk"
scsi1:0.mode = "independent-persistent"
#scsi1:0.deviceType = "disk"
scsi1:1.present = "TRUE"
scsi1:1.fileName = "C:\vms\RAC\ASM11g\share\datadisk2.vmdk"
scsi1:1.mode = "independent-persistent"
#scsi1:1.deviceType = "disk"
scsi1:2.present = "TRUE"
scsi1:2.fileName = "C:\vms\RAC\ASM11g\share\datadisk3.vmdk"
scsi1:2.mode = "independent-persistent"
#scsi1:2.deviceType = "disk"
scsi1:3.present = "TRUE"
scsi1:3.fileName = "C:\vms\RAC\ASM11g\share\ocrdisk.vmdk"
scsi1:3.mode = "independent-persistent"
#scsi1:3.deviceType = "disk"
scsi1:4.present = "TRUE"
scsi1:4.fileName = "C:\vms\RAC\ASM11g\share\votingdisk.vmdk"
scsi1:4.mode = "independent-persistent"
#scsi1:4.deviceType = "disk"
scsi1.virtualDev = "lsilogic"
ide1:0.autodetect = "FALSE"
Ethernet1.present = "TRUE"
Ethernet1.connectionType = "hostonly"
scsi0:0.redo = ""
scsi1:0.redo = ""
scsi1:1.redo = ""
scsi1:2.redo = ""
scsi1:3.redo = ""
scsi1:4.redo = ""
ethernet0.addressType = "generated"
ethernet1.addressType = "generated"
uuid.location = "56 4d f6 04 91 f9 39 2c-b9 3f 19 f1 c4 af 8a 39"
uuid.bios = "56 4d f6 04 91 f9 39 2c-b9 3f 19 f1 c4 af 8a 39"
ethernet0.generatedAddress = "00:0c:29:af:8a:39"
ethernet0.generatedAddressOffset = "0"
ethernet1.generatedAddress = "00:0c:29:af:8a:43"
ethernet1.generatedAddressOffset = "10"
ide1:0.startConnected = "TRUE"
tools.syncTime = "TRUE"
workingDir = "."
Configuration File - End Here
Linux Installation - Start Here
"Edit The Virtual Machine Setting" under VMWare Server Controls

Select The "CD-ROM" under Hardware Tab

Change the Connection on right Pane of CD-ROM from Use Physical Drive to Use ISO Image. You can place you Linux ISO Image on your Hard Drive Or copy the ISO Image on CD-ROM. I Staged the Oracle Enterprise Linux on my Hard Drive C:\Software.

Select the Second option "Use ISO Image" under Connection.

Browse the First ISO Image of Oracle Enterprise Linux (disc1) under "Use ISO Image" and Click on "OK"

Click on "Start this Virtual Machine and You will see Linux boot: Prompt. Press Enter to Continue with Linux Installation.

Linux Driver Installation Screen

Linux O/S is test CD on this step. Press Tab to Skip this test

Probing for Video Card

Click Next to Continue with Linux Installation

Linux O/S Language Selection - By Default "English(English)"

Select appropriate Keyboard for the System (U.S English). Click "Next" and a Warning Message will display. Press "Yes" to Continue.

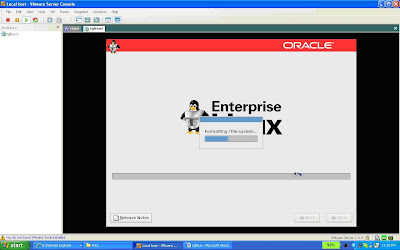
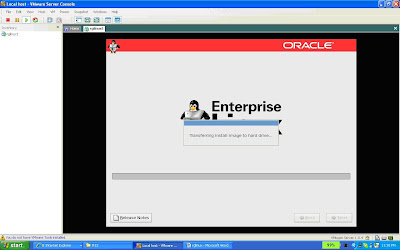
Keep Default selection on this page and Select "Next" to Continue with Linux Installation.


Subscribe to:
Posts (Atom)