Oracle Enterprise Manager Grid Control Installation 10g R2 (10.2) Basic Installation Methods (Linux x86 - Red Hat Enterprise Linux 4.0) - Enterprise Manager Grid Control Using a New Database Enterprise Manager Grid Control Using an Existing Database
- Advance Installation Methods (Linux x86 - Red Hat Enterprise Linux 4.0)
# Install Grid Control in any non-interactive mode
# Configure your system to support installation of an additional Management Service or Management Agent
# Upgrade an existing installation to the latest version
# Install Grid Control on Real Application Clusters
# Troubleshoot your installation session
# Configure post-installation settings
# Use Enterprise Manager Grid Control
# Require secure communications between all Management Agents and the secure Management Service
Ref Oracle Documentation: http://www.oracle.com/technology/documentation/oem.html
In this post, Only the basic installation methods are covered. I will discuss the advance installation methods in future posts
System Requirements
# Check system pre-req using Oracle Universal Installer # Check Space & Memory Requirement
Enterprise Manager Grid Control Using a New Database => 4.5 GB, min 1GB o/s memory
Enterprise Manager Grid Control Using an Existing Database => 2.5 GB, min 1GB o/s memory
# Hardware Requirements (To run Enterprise Manager)
For Management Service => Min 1GHz processor speed,Min 2GB of free physical memory
For Managment Repository node => Min 2GB of free physical memory
# Software Requirements:The system must meet minimum software requirement for
o/s,packages and kernel parameters
#O/S Requirements
For New Database Installation the o/s must be one of the following:-
- Red Hat Enterprise Linux 3.0 (kernel version 2.4.9.25) - Red Hat Enterprise Linux 4.0 (kernel version 2.6.9) - SUSE Linux Server Enterprise 9 (kernel version 2.4.9.25)
#Pacakge Requirements
For Red Hat Enterprise Linux 4.0:
- glibc-2.3.4-2.9, make-3.79,binutils-2.15.92.0.2-13,gcc-3.4.3-22.1
- libaio-0.3.96,glibgc-common-2.3.4-2.9,setarch-1.6-1,pdksh-5.2.14-30
- openmotif21-2.1.30-11,sysstat-5.0.5-1,gnome-libs-1.4.1.2.90-44.1
- libstdc++-3.4.3-22.1,libstdc++devel-3.4.3-22.1,compat-libstdc++-296-2.96-132.7.2
- compat-db-4.1.25-9,control-center-2.8.0-12,xscreensaver-4.18-5.rhel4.2
#Kernel Parameters Requirements
- semmsl & semmsl2 = 250,semmns = 32000,semopm = 100,semmni = 128,shmmax = 536870912
- shmmni = 4096,shmall = 2097152,filemax = 65536,ip_local_port_range = 1024 65000
- rmem_default = 262144,rmem_max = 262144,wmem_default = 262144,wmem_max = 262144
You can change Kernel parameter settings in /etc/sysctl.conf. You may need to reboot your system after changing kernel parameters
# Mount the Oracle Enterprise Manger Grid Control Disk
Switch to user root
su - root
# mount -t iso9660 /dev/dvd /mnt/dvd
#Install OEM Grid Control
a. Go to Disk1 under the mounted location (OEM Proudct DVD) and Run the installer
./runInstaller
b. OUI Screen will appear which will show you "Specify Installation Type" . Select the one installation types provided on this Screen. By default Complete installation is selected. OUI screen are easy to navigate,opt and also have useful help provided.
You need to enter the following information on OUI screens.
- specify Installation Location=> Installation's Parent directory. Sub-directories are create under parent directory of all ORACLE_HOME installations
- Language Selection => languages to run Grid Control in.Selection of language at this point is for installation session.
- Inventory Directory and Credentials=> This option will populate only once on your first installation of Oracle products.
- Product-Specific Prerequisite Checks => This will check all Hardware and software requirement to configure Oracle Software.
- Specify Configuration=> This option populate only for "Enterprise Manager Grid Control Using a New Database". At this point you can specify Database name,location of Management Repository files. Select location which is outside to your ORACLE_HOME.Select at this point two groups which required to grant SYSDBA and SYSOPER privileges required to create new database (OSDBA,OSOPERgroup).
- Specify Repository Database Configuration =>This option will populate only for "Enterprise Manager Grid Control Using an Existing Database". You can specify here Database connection details of your existing database,also locations of the new Management Repository tablespaces. - Specify Optional=> You can configure these option after Grid control installation like email,Oracle metalink credentials and proxy configuration settings.
- Configuration,Security Options=> This will populate only for "Enterprise Manager Grid Control Using a New Database". Specify password to secure the Management service and the management repository database.
- Specify Passwords=> This will populate for "Enterprise Manager Grid Control Using an Existing Database". Specify password for secure Management Service and SYSMAN user.
- Summary => You can review the information and then click on install
- Install=> You can see the status of you installation
- Execute Configuration Scripts=> Run the script as root user. Read the instructions carefully before execution.
- Configuration Assistants=> You can see status of Confiuration Assistants.
- End of Installation=> Information about your installation,including the URL's of your applications.Port information of these URL's stored in $ORACLE_HOME/install/portlist.ini
I will discuss about other Installation or Upgrade Options in my next post.
- Install an additional Management Service.
- Install Management Agents using the Agent Deployment application.

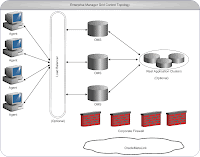
 Fig 2: Enterprise Grid Control Topology
 Fig 2: Enterprise Grid Control Topology